貢獻點
貢獻點是在 擴充套件清單 的 contributes 欄位中進行的一組 JSON 宣告。您的擴充套件透過註冊 貢獻點 來擴充套件 Visual Studio Code 中的各種功能。以下是所有可用 貢獻點 的列表:
認證breakpointscolors命令configurationconfigurationDefaultscustomEditorsdebuggersgrammarsiconsiconThemesjsonValidationkeybindings語言menusproblemMatchersproblemPatternsproductIconThemesresourceLabelFormatterssemanticTokenModifierssemanticTokenScopessemanticTokenTypessnippetssubmenustaskDefinitionsterminalthemestypescriptServerPluginsviewsviewsContainersviewsWelcomewalkthroughs
contributes.authentication
貢獻一個身份驗證提供程式。這將為您的提供程式設定一個啟用事件,並在您的擴充套件功能中顯示它。
{
  "contributes": {
    "authentication": [
      {
        "label": "Azure DevOps",
        "id": "azuredevops"
      }
    ]
  }
}
contributes.breakpoints
通常,偵錯程式擴充套件也會有一個 contributes.breakpoints 條目,在該條目中擴充套件列出了支援設定斷點的檔案型別。
{
  "contributes": {
    "breakpoints": [
      {
        "language": "javascript"
      },
      {
        "language": "javascriptreact"
      }
    ]
  }
}
contributes.colors
貢獻新的可主題化顏色。擴充套件可以在編輯器裝飾器和狀態列中使用這些顏色。定義後,使用者可以在 workspace.colorCustomization 設定中自定義顏色,使用者主題也可以設定顏色值。
{
  "contributes": {
    "colors": [
      {
        "id": "superstatus.error",
        "description": "Color for error message in the status bar.",
        "defaults": {
          "dark": "errorForeground",
          "light": "errorForeground",
          "highContrast": "#010203",
          "highContrastLight": "#feedc3"
        }
      }
    ]
  }
}
顏色的預設值可以為淺色、深色和高對比度主題定義,並且可以是現有顏色的引用或 顏色十六進位制值。
擴充套件可以使用 ThemeColor API 來使用新的和現有的主題顏色。
const errorColor = new vscode.ThemeColor('superstatus.error');
contributes.commands
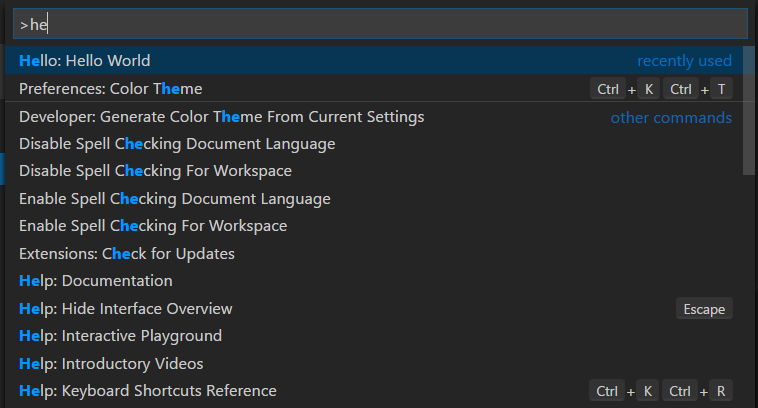
為命令貢獻 UI,包括一個標題以及(可選的)圖示、類別和啟用狀態。啟用狀態使用 when 子句 來表達。預設情況下,命令顯示在命令面板(⇧⌘P (Windows, Linux Ctrl+Shift+P))中,但它們也可以顯示在其他 選單 中。
貢獻命令的顯示方式取決於包含它的選單。例如,命令面板會在命令前加上它們的 category,以便於分組。但是,命令面板不顯示圖示或停用的命令。另一方面,編輯器上下文選單顯示停用的專案,但不顯示類別標籤。
注意:當命令被呼叫時(透過快捷鍵、命令面板、任何其他選單或以程式設計方式),VS Code 將發出一個啟用事件
onCommand:${command}。
注意:使用 產品圖示中的圖示時,設定
light和dark將會停用該圖示。正確的語法是"icon": "$(book)"。
命令示例
{
  "contributes": {
    "commands": [
      {
        "command": "extension.sayHello",
        "title": "Hello World",
        "category": "Hello",
        "icon": {
          "light": "path/to/light/icon.svg",
          "dark": "path/to/dark/icon.svg"
        }
      }
    ]
  }
}
請參閱 命令擴充套件指南,瞭解更多關於在 VS Code 擴充套件中使用命令的資訊。
命令圖示規範
大小:圖示應為 16x16,留有 1 畫素的填充(影像為 14x14)並居中。顏色:圖示應使用單一顏色。格式:建議圖示為 SVG,但接受任何影像檔案型別。
![]()
contributes.configuration
貢獻將暴露給使用者的設定。使用者將能夠透過設定編輯器或直接編輯 settings.json 檔案來設定這些配置選項。
此部分可以是一個單獨的物件,代表一個設定類別,也可以是一個物件陣列,代表多個設定類別。如果有多個設定類別,設定編輯器將在目錄表中為該擴充套件顯示一個子選單,並且 title 鍵將用作子選單項的名稱。
配置示例
{
  "contributes": {
    "configuration": {
      "title": "Settings Editor Test Extension",
      "type": "object",
      "properties": {
        "settingsEditorTestExtension.booleanExample": {
          "type": "boolean",
          "default": true,
          "description": "Boolean Example"
        },
        "settingsEditorTestExtension.stringExample": {
          "type": "string",
          "default": "Hello World",
          "description": "String Example"
        }
      }
    }
  }
}
您可以使用 vscode.workspace.getConfiguration('myExtension') 從擴充套件中讀取這些值。
配置架構
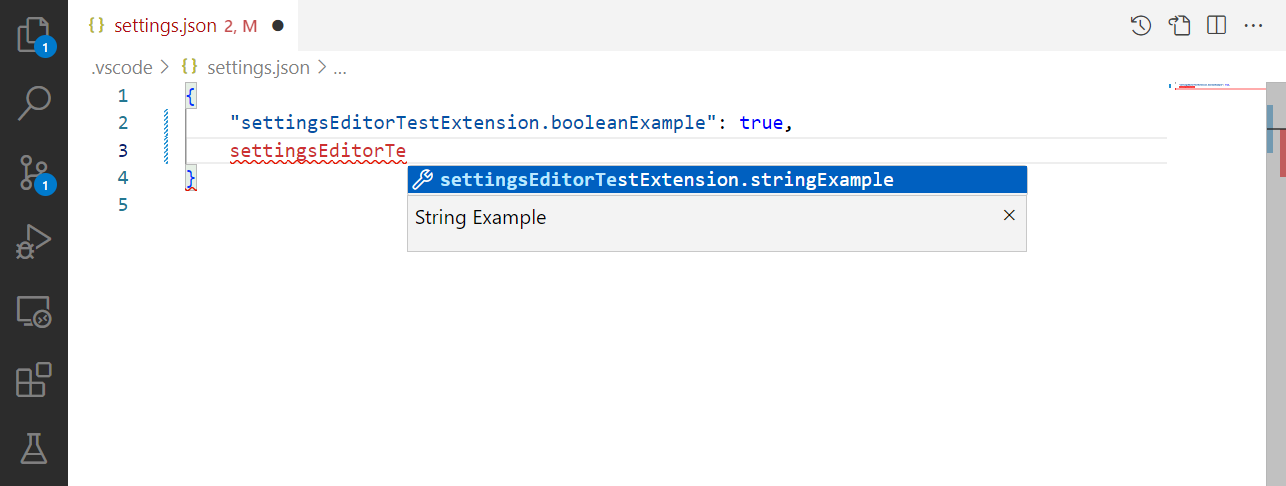
您的配置條目既用於在 JSON 編輯器中編輯設定時提供智慧感知,也用於定義它們在設定 UI 中的顯示方式。
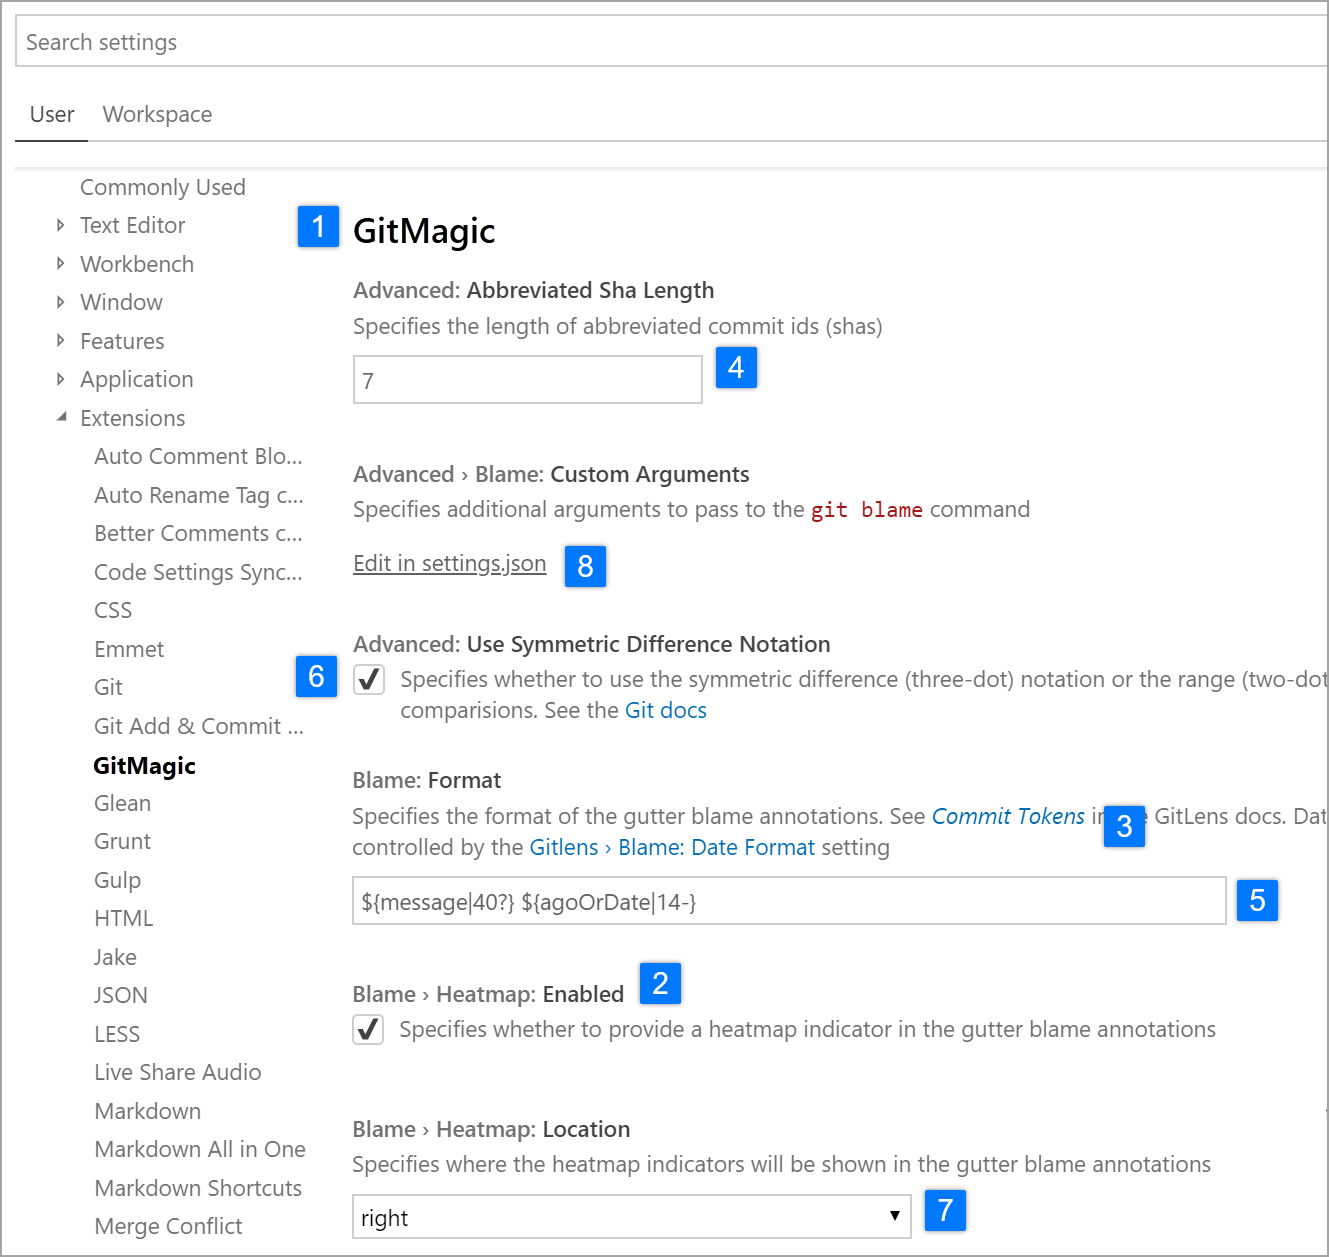
title
類別 1️⃣ 的 title 是該類別的標題。
{
  "configuration": {
    "title": "GitMagic"
  }
}
對於具有多個設定類別的擴充套件,如果其中一個類別的 title 與擴充套件的顯示名稱相同,那麼設定 UI 將該類別視為“預設類別”,忽略該類別的 order 欄位,並將其設定放在主擴充套件標題下方。
對於 title 和 displayName 欄位,像“Extension”、“Configuration”和“Settings”這樣的詞是冗餘的。
- ✔
"title": "GitMagic" - ❌
"title": "GitMagic Extension" - ❌
"title": "GitMagic Configuration" - ❌
"title": "GitMagic Extension Configuration Settings"
properties
configuration 物件中的 properties 2️⃣ 將構成一個字典,其中鍵是設定 ID,值是對設定的更多資訊。雖然一個擴充套件可以包含多個設定類別,但擴充套件的每個設定仍必須有其唯一的 ID。設定 ID 不能是另一個設定 ID 的完整字首。
沒有顯式 order 欄位的屬性將按字母順序顯示在設定 UI 中(不是在清單中列出的順序)。
設定標題
在設定 UI 中,將使用多個欄位來構建每個設定的顯示標題。鍵中的大寫字母用於指示單詞分隔符。
單類別和預設類別配置的顯示標題
如果配置只有一個設定類別,或者該類別的 title 與擴充套件的顯示名稱相同,那麼對於該類別中的設定,設定 UI 將使用設定 ID 和擴充套件 name 欄位來確定顯示標題。
例如,對於設定 ID gitMagic.blame.dateFormat 和副檔名 authorName.gitMagic,由於設定 ID 的字首與副檔名的字尾匹配,因此在顯示標題中將刪除設定 ID 的 gitMagic 部分:“Blame: Date Format”。
多類別配置的顯示標題
如果配置有多個設定類別,並且該類別的 title 與擴充套件的顯示名稱不同,那麼對於該類別中的設定,設定 UI 將使用設定 ID 和類別 id 欄位來確定顯示標題。
例如,對於設定 ID css.completion.completePropertyWithSemicolon 和類別 ID css,由於設定 ID 的字首與類別 ID 的字尾匹配,因此在設定 UI 中將刪除 css 部分,併為該設定生成標題:“Completion: Complete Property With Semicolon”。
配置屬性架構
配置鍵是使用 JSON Schema 的超集定義的。
description / markdownDescription
您的 description 3️⃣ 出現在標題之後、輸入欄位之前,除了布林值,其描述將用作複選框的標籤。6️⃣
{
  "gitMagic.blame.heatMap.enabled": {
    "description": "Specifies whether to provide a heatmap indicator in the gutter blame annotations"
  }
}
如果您使用 markdownDescription 而不是 description,您的設定描述將在設定 UI 中被解析為 Markdown。
{
  "gitMagic.blame.dateFormat": {
    "markdownDescription": "Specifies how to format absolute dates (e.g. using the `${date}` token) in gutter blame annotations. See the [Moment.js docs](https://momentjs.com/docs/#/displaying/format/) for valid formats"
  }
}
對於 markdownDescription,為了新增換行符或多個段落,請使用字串 \n\n 來分隔段落,而不是僅僅使用 \n。
type
number 4️⃣、string 5️⃣、boolean 6️⃣ 型別的條目可以直接在設定 UI 中編輯。
{
  "gitMagic.views.pageItemLimit": {
    "type": "number",
    "default": 20,
    "markdownDescription": "Specifies the number of items to show in each page when paginating a view list. Use 0 to specify no limit"
  }
}
如果字串設定在配置條目上設定了 "editPresentation": "multilineText",則該字串設定可以使用多行文字輸入進行渲染。
對於 boolean 條目,markdownDescription(或在未指定 markdownDescription 時為 description)將用作複選框旁邊的標籤。
{
  "gitMagic.blame.compact": {
    "type": "boolean",
    "description": "Specifies whether to compact (deduplicate) matching adjacent gutter blame annotations"
  }
}
某些 object 和 array 型別的設定將在設定 UI 中渲染。簡單的 number、string 或 boolean 陣列將渲染為可編輯列表。具有 string、number、integer 和/或 boolean 型別屬性的物件將渲染為可編輯的鍵值網格。物件設定還應將 additionalProperties 設定為 false,或設定為具有適當 type 屬性的物件,以便在 UI 中渲染。
如果 object 或 array 型別的設定還可以包含其他型別,如巢狀物件、陣列或 null,那麼該值將不會在設定 UI 中渲染,只能透過直接編輯 JSON 來修改。使用者將看到一個指向“在 settings.json 中編輯”的連結,如上圖所示。8️⃣
order
類別和類別中的設定都可以接受一個整數 order 型別屬性,該屬性用於指示它們相對於其他類別和/或設定的排序方式。
如果兩個類別具有 order 屬性,則 order 號較低的類別在前。如果一個類別沒有 order 屬性,它將出現在具有該屬性的類別之後。
如果在同一類別中的兩個設定具有 order 屬性,則 order 號較低的設定在前。如果在同一類別中的另一個設定沒有 order 屬性,它將出現在該類別中具有該屬性的設定之後。
如果兩個類別具有相同的 order 屬性值,或者同一類別中的兩個設定具有相同的 order 屬性值,則它們將在設定 UI 中按遞增的字母順序排序。
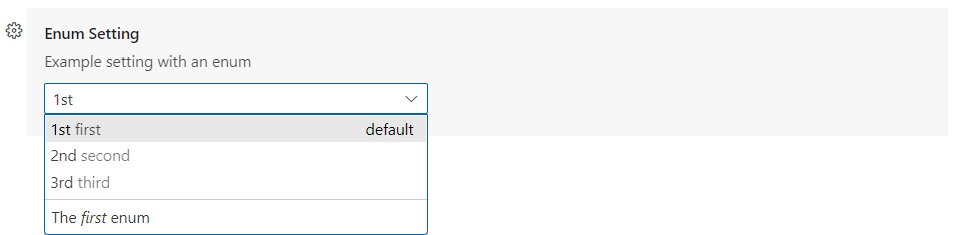
enum / enumDescriptions / markdownEnumDescriptions / enumItemLabels
如果您在 enum 7️⃣ 屬性下提供了專案陣列,設定 UI 將渲染一個這些專案的下拉選單。
您還可以提供一個 enumDescriptions 屬性,這是一個與 enum 屬性長度相同的字串陣列。enumDescriptions 屬性在設定 UI 的下拉選單底部為每個 enum 專案提供描述。
您也可以使用 markdownEnumDescriptions 而不是 enumDescriptions,並且您的描述將被解析為 Markdown。markdownEnumDescriptions 優先於 enumDescriptions。
要自定義設定 UI 中的下拉選項名稱,可以使用 enumItemLabels。
示例
{
  "settingsEditorTestExtension.enumSetting": {
    "type": "string",
    "enum": ["first", "second", "third"],
    "markdownEnumDescriptions": [
      "The *first* enum",
      "The *second* enum",
      "The *third* enum"
    ],
    "enumItemLabels": ["1st", "2nd", "3rd"],
    "default": "first",
    "description": "Example setting with an enum"
  }
}
deprecationMessage / markdownDeprecationMessage
如果您設定了 deprecationMessage 或 markdownDeprecationMessage,該設定將獲得一條帶有您指定訊息的警告下劃線。此外,除非使用者配置了該設定,否則該設定將從設定 UI 中隱藏。如果您設定了 markdownDeprecationMessage,Markdown 將不會在設定的懸停或問題檢視中渲染。如果您同時設定了這兩個屬性,deprecationMessage 將在懸停和問題檢視中顯示,而 markdownDeprecationMessage 將在設定 UI 中作為 Markdown 渲染。
示例
{
  "json.colorDecorators.enable": {
    "type": "boolean",
    "description": "Enables or disables color decorators",
    "markdownDeprecationMessage": "**Deprecated**: Please use `#editor.colorDecorators#` instead.",
    "deprecationMessage": "Deprecated: Please use editor.colorDecorators instead."
  }
}
其他 JSON Schema 屬性
您可以使用任何驗證 JSON Schema 屬性來描述配置值的其他約束。
default用於定義屬性的預設值minimum和maximum用於限制數值maxLength、minLength用於限制字串長度pattern用於將字串限制為給定的正則表示式patternErrorMessage用於在模式不匹配時提供定製的錯誤訊息。format用於將字串限制為常見格式,如date、time、ipv4、email和uri。maxItems、minItems用於限制陣列長度editPresentation用於控制在設定編輯器中為字串設定渲染單行輸入框還是多行文字區域。
不支援的 JSON Schema 屬性
在配置部分不支援的是:
$ref和definition:配置模式需要是自包含的,並且不能假設聚合設定 JSON 模式文件的外觀。
有關這些和其他功能的更多詳細資訊,請參閱 JSON Schema 參考。
scope
配置設定可以具有以下任一範圍:
application- 適用於所有 VS Code 例項的設定,只能在使用者設定中配置。machine- 機器特定的設定,只能在使用者設定或遠端設定中設定。例如,不應跨機器共享的安裝路徑。這些設定的值不會被同步。machine-overridable- 機器特定的設定,可以被工作區或資料夾設定覆蓋。這些設定的值不會被同步。window- 視窗(例項)特定的設定,可以在使用者、工作區或遠端設定中配置。resource- 資源設定,適用於檔案和資料夾,可以在所有設定級別配置,包括資料夾設定。language-overridable- 可以在語言級別覆蓋的資源設定。
配置範圍決定了設定在設定編輯器中對使用者可用時機以及設定是否適用。如果未宣告 scope,則預設為 window。
以下是內建 Git 擴充套件的示例配置範圍:
{
  "contributes": {
    "configuration": {
      "title": "Git",
      "properties": {
        "git.alwaysSignOff": {
          "type": "boolean",
          "scope": "resource",
          "default": false,
          "description": "%config.alwaysSignOff%"
        },
        "git.ignoredRepositories": {
          "type": "array",
          "default": [],
          "scope": "window",
          "description": "%config.ignoredRepositories%"
        },
        "git.autofetch": {
          "type": ["boolean", "string"],
          "enum": [true, false, "all"],
          "scope": "resource",
          "markdownDescription": "%config.autofetch%",
          "default": false,
          "tags": ["usesOnlineServices"]
        }
      }
    }
  }
}
您可以看到 git.alwaysSignOff 具有 resource 範圍,可以按使用者、工作區或資料夾設定,而具有 window 範圍的忽略的儲存庫列表則更全域性地應用於 VS Code 視窗或工作區(可能是多根的)。
ignoreSync
您可以將 ignoreSync 設定為 true,以防止設定與使用者設定同步。這對於非使用者特定的設定很有用。例如,remoteTunnelAccess.machineName 設定不是使用者特定的,不應同步。請注意,如果您將 scope 設定為 machine 或 machine-overridable,無論 ignoreSync 的值如何,該設定都不會被同步。
{
  "contributes": {
    "configuration": {
      "properties": {
        "remoteTunnelAccess.machineName": {
          "type": "string",
          "default": "",
          "ignoreSync": true
        }
      }
    }
  }
}
連結到設定
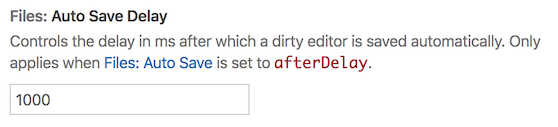
您可以透過在 markdown 型別屬性中使用此特殊語法:`#target.setting.id#` 來插入到另一個設定的連結,該連結將在設定 UI 中渲染為可點選連結。這適用於 markdownDescription、markdownEnumDescriptions 和 markdownDeprecationMessage。示例:
  "files.autoSaveDelay": {
    "markdownDescription": "Controls the delay in ms after which a dirty editor is saved automatically. Only applies when `#files.autoSave#` is set to `afterDelay`.",
    // ...
  }
在設定 UI 中,這被渲染為:
contributes.configurationDefaults
為其他已註冊配置貢獻預設值並覆蓋其預設值。
以下示例將 files.autoSave 設定的預設行為覆蓋為在焦點更改時自動儲存檔案。
"configurationDefaults": {
      "files.autoSave": "onFocusChange"
}
您還可以為提供的語言貢獻預設編輯器配置。例如,以下程式碼片段為 markdown 語言貢獻了預設編輯器配置:
{
  "contributes": {
    "configurationDefaults": {
      "[markdown]": {
        "editor.wordWrap": "on",
        "editor.quickSuggestions": {
          "comments": "off",
          "strings": "off",
          "other": "off"
        }
      }
    }
  }
}
contributes.customEditors
customEditors 貢獻點是您的擴充套件告知 VS Code 其提供的自定義編輯器的途徑。例如,VS Code 需要知道您的自定義編輯器處理哪種型別的檔案,以及如何在任何 UI 中識別您的自定義編輯器。
以下是 自定義編輯器擴充套件示例 的基本 customEditor 貢獻:
"contributes": {
  "customEditors": [
    {
      "viewType": "catEdit.catScratch",
      "displayName": "Cat Scratch",
      "selector": [
        {
          "filenamePattern": "*.cscratch"
        }
      ],
      "priority": "default"
    }
  ]
}
customEditors 是一個數組,因此您的擴充套件可以貢獻多個自定義編輯器。
-
viewType- 您的自定義編輯器的唯一識別符號。這是 VS Code 將
package.json中的自定義編輯器貢獻與其程式碼中的自定義編輯器實現聯絡起來的方式。這在所有擴充套件中必須是唯一的,因此請使用一個對您的擴充套件來說唯一的viewType,例如"viewType": "myAmazingExtension.svgPreview",而不是像"preview"這樣通用的viewType。 -
displayName- 在 VS Code UI 中標識自定義編輯器的名稱。顯示名稱會顯示給使用者,例如在檢視:使用...重新開啟下拉選單中。
-
selector- 指定自定義編輯器適用於哪些檔案。selector是一個或多個 glob 模式的陣列。這些 glob 模式會與檔名匹配,以確定自定義編輯器是否可用於這些檔案。像*.png這樣的filenamePattern將為所有 PNG 檔案啟用自定義編輯器。您還可以建立更具體的模式來匹配檔名或目錄名,例如
**/translations/*.json。 -
priority- (可選) 指定何時使用自定義編輯器。priority控制當資源開啟時自定義編輯器的使用時機。可能的值包括:"default"- 嘗試對匹配自定義編輯器selector的每個檔案使用自定義編輯器。如果存在多個自定義編輯器,使用者將需要選擇他們想要使用的自定義編輯器。"option"- 預設不使用自定義編輯器,但允許使用者切換到它或將其配置為預設。
您可以在 自定義編輯器 擴充套件指南中瞭解更多資訊。
contributes.debuggers
向 VS Code 貢獻一個偵錯程式。偵錯程式貢獻具有以下屬性:
type是一個唯一 ID,用於在啟動配置中標識此偵錯程式。label是此偵錯程式在 UI 中的使用者可見名稱。program是實現 VS Code 除錯協議(針對真實偵錯程式或執行時)的除錯介面卡的路徑。runtime如果除錯介面卡的路徑不是可執行檔案但需要執行時。configurationAttributes是此偵錯程式特定的啟動配置引數的模式。請注意,JSON 模式構造$ref和definition不受支援。initialConfigurations列出了用於填充初始 launch.json 的啟動配置。configurationSnippets列出了在編輯 launch.json 時可透過 IntelliSense 獲得的啟動配置。variables引入了替換變數,並將它們繫結到偵錯程式擴充套件實現的命令。languages除錯擴充套件可以被認為是“預設偵錯程式”的語言。
偵錯程式示例
{
  "contributes": {
    "debuggers": [
      {
        "type": "node",
        "label": "Node Debug",

        "program": "./out/node/nodeDebug.js",
        "runtime": "node",

        "languages": ["javascript", "typescript", "javascriptreact", "typescriptreact"],

        "configurationAttributes": {
          "launch": {
            "required": ["program"],
            "properties": {
              "program": {
                "type": "string",
                "description": "The program to debug."
              }
            }
          }
        },

        "initialConfigurations": [
          {
            "type": "node",
            "request": "launch",
            "name": "Launch Program",
            "program": "${workspaceFolder}/app.js"
          }
        ],

        "configurationSnippets": [
          {
            "label": "Node.js: Attach Configuration",
            "description": "A new configuration for attaching to a running node program.",
            "body": {
              "type": "node",
              "request": "attach",
              "name": "${2:Attach to Port}",
              "port": 9229
            }
          }
        ],

        "variables": {
          "PickProcess": "extension.node-debug.pickNodeProcess"
        }
      }
    ]
  }
}
要獲取有關如何整合 debugger 的完整教程,請訪問 偵錯程式擴充套件。
contributes.grammars
向語言貢獻 TextMate 語法。您必須提供此語法適用的 language、語法的 TextMate scopeName 和檔案路徑。
注意:包含語法的檔案的格式可以是 JSON(檔名以 .json 結尾)或 XML plist 格式(所有其他檔案)。
語法示例
{
  "contributes": {
    "grammars": [
      {
        "language": "markdown",
        "scopeName": "text.html.markdown",
        "path": "./syntaxes/markdown.tmLanguage.json",
        "embeddedLanguages": {
          "meta.embedded.block.frontmatter": "yaml"
        }
      }
    ]
  }
}
請參閱 語法高亮指南,瞭解如何註冊與語言關聯的 TextMate 語法以接收語法高亮。
contributes.icons
透過 ID 貢獻新圖示,以及一個預設圖示。該圖示 ID 隨後可供擴充套件(或任何依賴於該擴充套件的其他擴充套件)在任何可以使用 ThemeIcon 的地方使用,例如 new ThemeIcon("iconId")、在 Markdown 字串中($(iconId)),以及在某些貢獻點作為圖示。
{
  "contributes": {
    "icons": {
      "distro-ubuntu": {
        "description": "Ubuntu icon",
        "default": {
          "fontPath": "./distroicons.woff",
          "fontCharacter": "\\E001"
        }
      },
      "distro-fedora": {
        "description": "Ubuntu icon",
        "default": {
          "fontPath": "./distroicons.woff",
          "fontCharacter": "\\E002"
        }
      }
    }
  }
}
contributes.iconThemes
向 VS Code 貢獻檔案圖示主題。檔案圖示顯示在檔名旁邊,指示檔案型別。
您必須指定一個 ID(用於設定)、一個標籤以及檔案圖示定義檔案的路徑。
檔案圖示主題示例
{
  "contributes": {
    "iconThemes": [
      {
        "id": "my-cool-file-icons",
        "label": "Cool File Icons",
        "path": "./fileicons/cool-file-icon-theme.json"
      }
    ]
  }
}
![]()
請參閱 檔案圖示主題指南,瞭解如何建立檔案圖示主題。
contributes.jsonValidation
為特定型別的 json 檔案貢獻驗證模式。url 值可以是擴充套件中包含的本地模式檔案的路徑,也可以是遠端伺服器 URL,例如 JSON Schema Store。
{
  "contributes": {
    "jsonValidation": [
      {
        "fileMatch": ".jshintrc",
        "url": "https://json.schemastore.org/jshintrc"
      }
    ]
  }
}
contributes.keybindings
貢獻一個鍵繫結規則,定義當用戶按下鍵組合時應呼叫哪個命令。請參閱 鍵繫結主題,其中詳細解釋了鍵繫結。
貢獻鍵繫結將導致預設鍵盤快捷方式顯示您的規則,並且命令的每個 UI 表示都將顯示您新增的鍵繫結。當然,當用戶按下鍵組合時,命令將被呼叫。
注意:由於 VS Code 在 Windows、macOS 和 Linux 上執行,這些平臺的修飾鍵不同,您可以使用“key”來設定預設的鍵組合,並針對特定平臺進行覆蓋。
注意:當命令被呼叫時(透過鍵繫結或命令面板),VS Code 將發出一個啟用事件
onCommand:${command}。
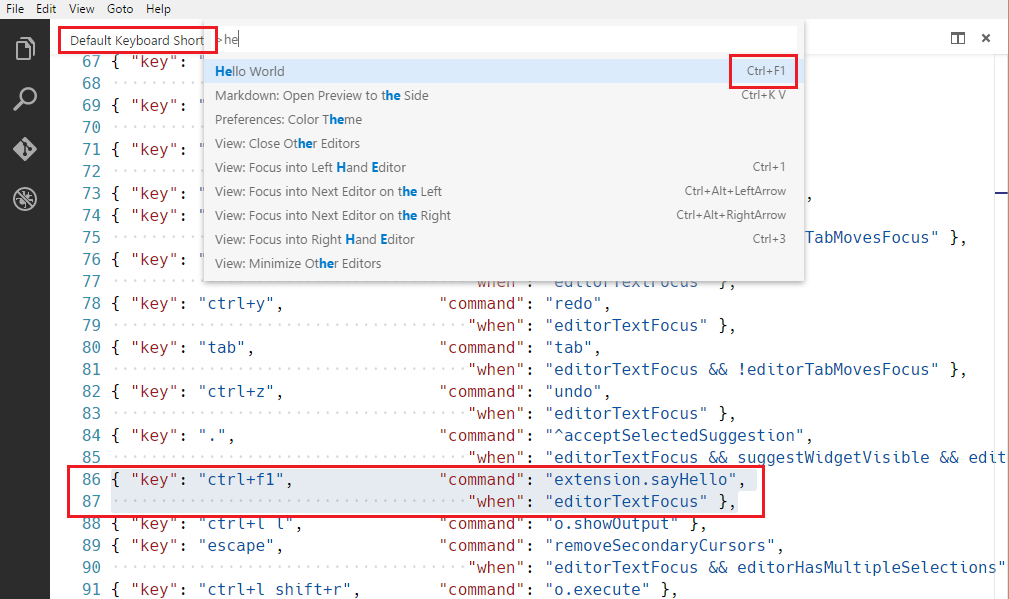
鍵繫結示例
定義 Ctrl+F1 在 Windows 和 Linux 上,以及 Cmd+F1 在 macOS 上觸發 "extension.sayHello" 命令。
{
  "contributes": {
    "keybindings": [
      {
        "command": "extension.sayHello",
        "key": "ctrl+f1",
        "mac": "cmd+f1",
        "when": "editorTextFocus"
      }
    ]
  }
}
contributes.languages
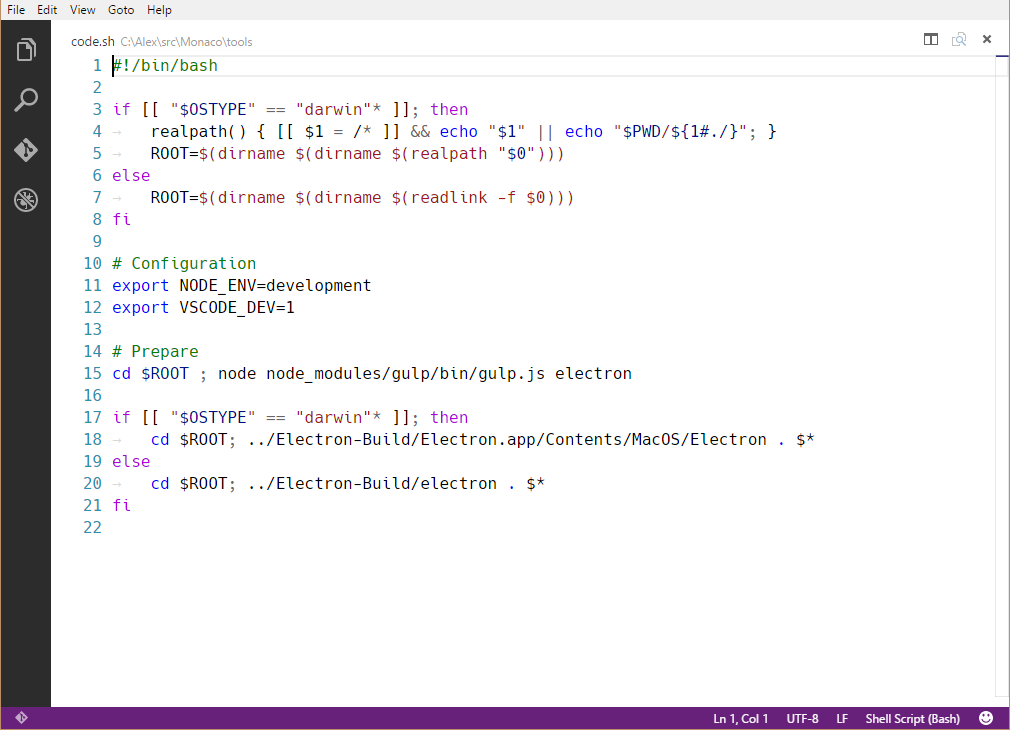
貢獻程式語言的定義。這將引入一種新語言或豐富 VS Code 關於某種語言的知識。
contributes.languages 的主要作用是:
- 定義一個
languageId,該languageId可在 VS Code API 的其他部分重用,例如vscode.TextDocument.languageId和onLanguage啟用事件。- 您可以使用
aliases欄位貢獻一個人類可讀的名稱。列表中的第一個專案將用作人類可讀的標籤。
- 您可以使用
- 將檔名副檔名(
extensions)、檔名(filenames)、檔名 glob 模式(filenamePatterns)、以特定行開頭的檔案(如 hashbang)(firstLine)和mimetypes關聯到該languageId。 - 為所貢獻的語言貢獻一組 宣告式語言特性。在 語言配置指南 中瞭解更多關於可配置的編輯功能。
- 貢獻一個圖示,該圖示可以在檔案圖示主題中使用,前提是主題中沒有該語言的圖示。
語言示例
{
  "contributes": {
    "languages": [
      {
        "id": "python",
        "extensions": [".py"],
        "aliases": ["Python", "py"],
        "filenames": [],
        "firstLine": "^#!/.*\\bpython[0-9.-]*\\b",
        "configuration": "./language-configuration.json",
        "icon": {
          "light": "./icons/python-light.png",
          "dark": "./icons/python-dark.png"
        }
      }
    ]
  }
}
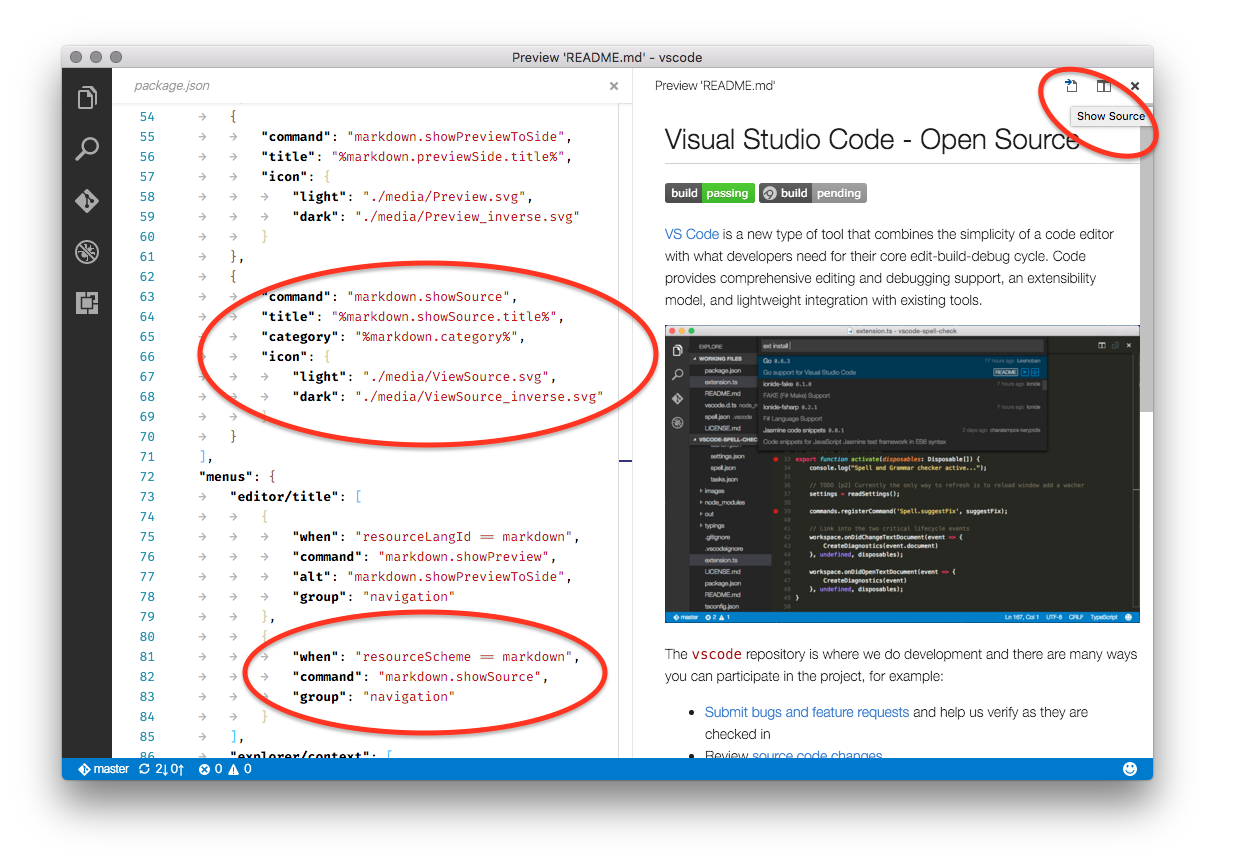
contributes.menus
向編輯器或資源管理器貢獻一個命令選單項。選單項定義包含選擇時要呼叫的命令以及該項應顯示的條件。後者使用 when 子句定義,該子句使用鍵繫結 when 子句上下文。
command 屬性表示選擇選單項時要執行的命令。submenu 屬性表示在此位置顯示的子選單。
在宣告 command 選單項時,還可以使用 alt 屬性定義一個替代命令。當按 Alt 開啟選單時,該命令將顯示並被呼叫。在 Windows 和 Linux 上,Shift 也有此功能,這在 Alt 會觸發視窗選單欄的情況下很有用。
最後,group 屬性定義了選單項的排序和分組。navigation 組是特殊的,因為它始終會排序到選單的頂部/開頭。
注意,
when子句適用於選單,而enablement子句適用於命令。enablement適用於所有選單,甚至鍵盤繫結,而when僅適用於單個選單。
目前擴充套件作者可以貢獻到:
commandPalette- 全域性命令面板comments/comment/title- 評論標題選單欄comments/comment/context- 評論上下文選單comments/commentThread/title- 評論執行緒標題選單欄comments/commentThread/context- 評論執行緒上下文選單debug/callstack/context- 除錯呼叫堆疊檢視上下文選單debug/callstack/contextgroupinline- 除錯呼叫堆疊檢視內聯操作debug/toolBar- 除錯檢視工具欄debug/variables/context- 除錯變數檢視上下文選單editor/context- 編輯器上下文選單editor/lineNumber/context- 編輯器行號上下文選單editor/title- 編輯器標題選單欄editor/title/context- 編輯器標題上下文選單editor/title/run- 編輯器標題選單欄上的執行子選單explorer/context- 資源管理器檢視上下文選單extension/context- 擴充套件檢視上下文選單file/newFile- 檔案選單和歡迎頁面上的新建檔案項interactive/toolbar- 互動式視窗工具欄interactive/cell/title- 互動式視窗單元格標題選單欄notebook/toolbar- 筆記本工具欄notebook/cell/title- 筆記本單元格標題選單欄notebook/cell/execute- 筆記本單元格執行選單scm/title- SCM 標題選單scm/resourceGroup/context- SCM 資源組選單scm/resourceFolder/context- SCM 資原始檔夾選單scm/resourceState/context- SCM 資源選單scm/change/title- SCM 更改標題選單scm/repository- SCM 儲存庫選單scm/sourceControl- SCM 源控制選單terminal/context- 終端上下文選單terminal/title/context- 終端標題上下文選單testing/item/context- 測試資源管理器專案上下文選單testing/item/gutter- 測試專案行內裝飾選單timeline/title- 時間線檢視標題選單欄timeline/item/context- 時間線檢視專案上下文選單touchBar- macOS 觸控欄view/title- 檢視標題選單view/item/context- 檢視專案上下文選單webview/context- 任何 webview 上下文選單- 任何 貢獻的子選單
注意 1:當命令從(上下文)選單呼叫時,VS Code 會嘗試推斷當前選定的資源,並在呼叫命令時將其作為引數傳遞。例如,資源管理器中的選單項會傳遞所選資源的 URI,編輯器中的選單項會傳遞文件的 URI。
注意 2:貢獻給
editor/lineNumber/context的選單項的命令也會被傳遞行號。此外,這些項可以在其when子句中引用editorLineNumber上下文鍵,例如透過使用in或not in運算子將其與擴充套件管理的陣列值上下文鍵進行測試。
除了標題之外,貢獻的命令還可以指定 VS Code 在將呼叫選單項顯示為按鈕(例如,在標題選單欄上)時使用的圖示。
選單示例
這是一個命令選單項:
{
  "contributes": {
    "menus": {
      "editor/title": [
        {
          "when": "resourceLangId == markdown",
          "command": "markdown.showPreview",
          "alt": "markdown.showPreviewToSide",
          "group": "navigation"
        }
      ]
    }
  }
}
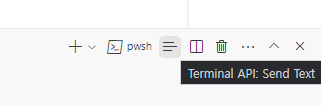
類似地,這是新增到特定檢視的命令選單項。下面的示例貢獻了一個任意檢視,例如終端:
{
  "contributes": {
    "menus": {
      "view/title": [
        {
          "command": "terminalApi.sendText",
          "when": "view == terminal",
          "group": "navigation"
        }
      ]
    }
  }
}
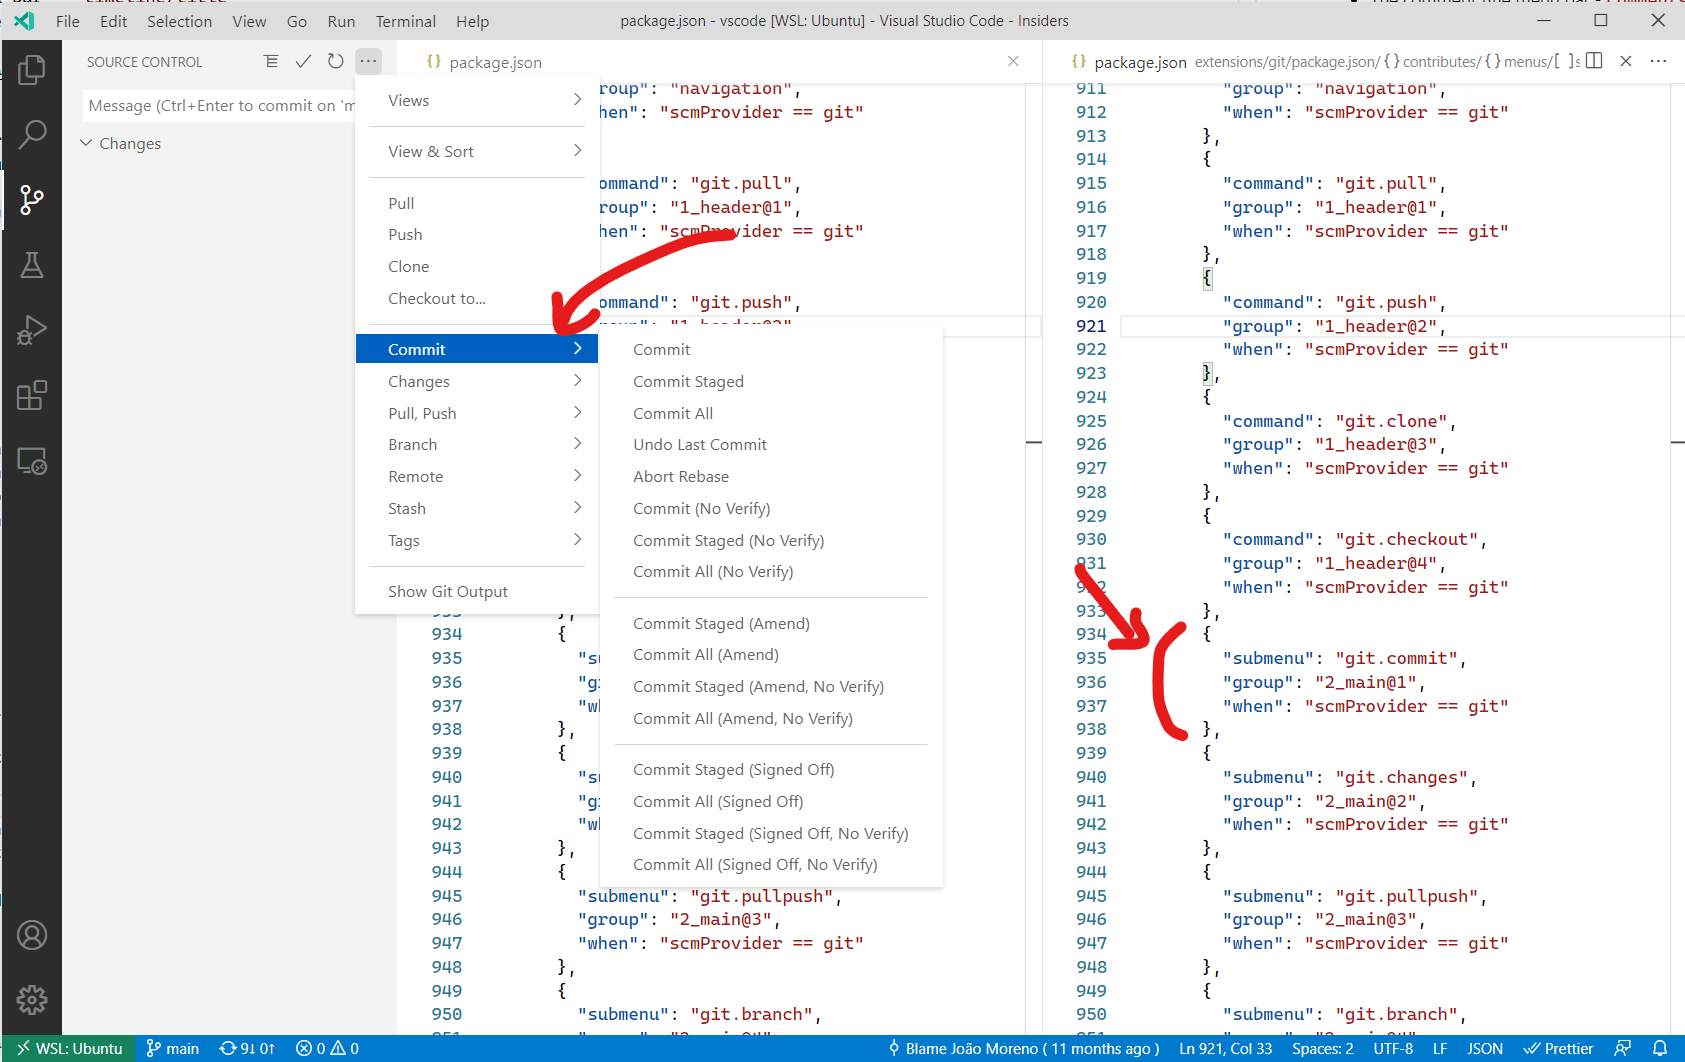
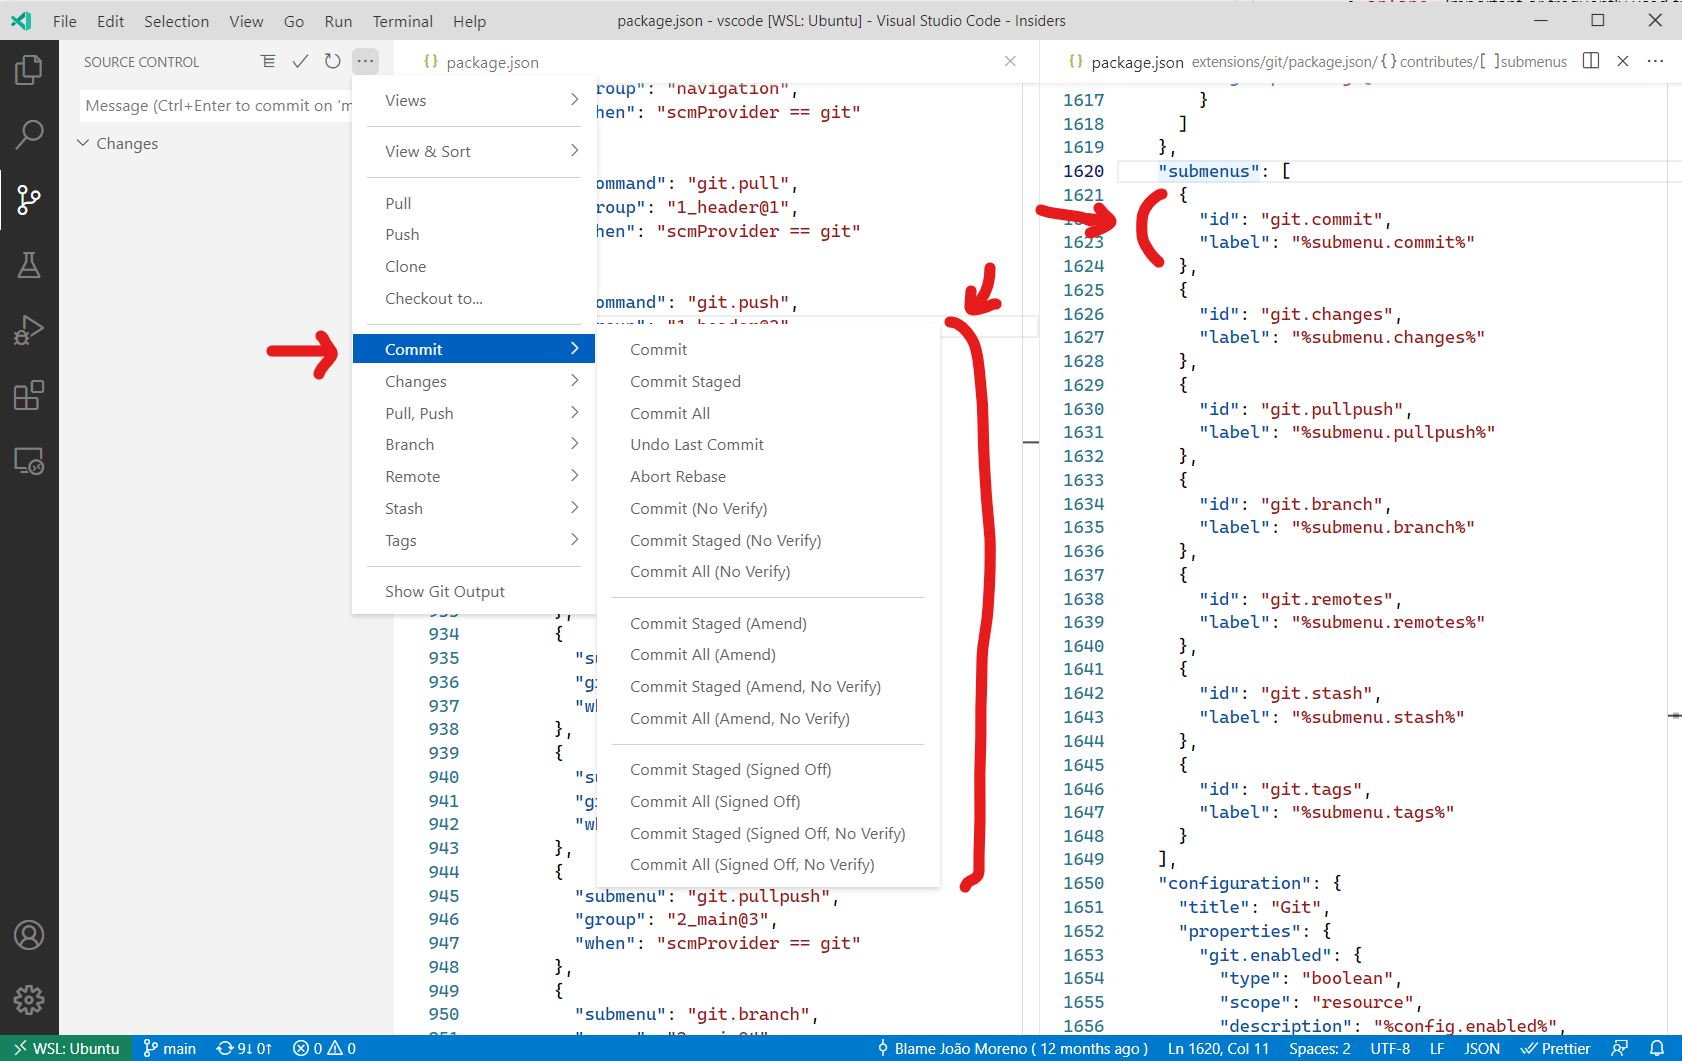
這是一個子選單項:
{
  "contributes": {
    "menus": {
      "scm/title": [
        {
          "submenu": "git.commit",
          "group": "2_main@1",
          "when": "scmProvider == git"
        }
      ]
    }
  }
}
命令面板選單項的上下文可見性
在 package.json 中註冊命令時,它們會自動顯示在命令面板(⇧⌘P (Windows, Linux Ctrl+Shift+P))中。為了更好地控制命令的可見性,提供了 commandPalette 選單項。它允許您定義一個 when 條件來控制命令是否在命令面板中可見。
下面的程式碼片段使“Hello World”命令僅在編輯器中有選中文字時才在命令面板中可見。
{
  "commands": [
    {
      "command": "extension.sayHello",
      "title": "Hello World"
    }
  ],
  "menus": {
    "commandPalette": [
      {
        "command": "extension.sayHello",
        "when": "editorHasSelection"
      }
    ]
  }
}
組的排序
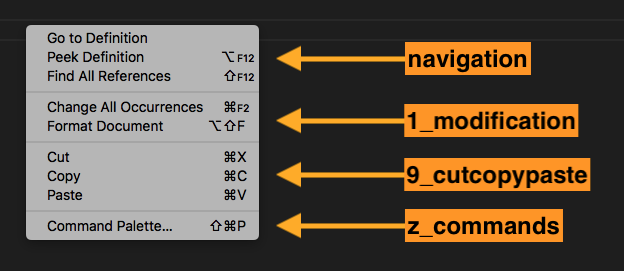
選單項可以分組。它們按字典順序排序,並遵循以下預設規則。您可以在它們之間、下方或上方新增選單項到這些組,或新增新的選單項組。
編輯器上下文選單包含這些預設組
navigation-navigation組始終排在首位。1_modification- 此組排在後面,包含修改程式碼的命令。9_cutcopypaste- 倒數第二個預設組,包含基本的編輯命令。z_commands- 最後一個預設組,包含一個開啟命令面板的條目。
資源管理器上下文選單包含這些預設組
navigation- 與 VS Code 導航相關的命令。此組始終排在首位。2_workspace- 與工作區操作相關的命令。3_compare- 與在 diff 編輯器中比較檔案相關的命令。4_search- 與在搜尋檢視中搜索相關的命令。5_cutcopypaste- 與剪下、複製和貼上檔案相關的命令。6_copypath- 與複製檔案路徑相關的命令。7_modification- 與檔案修改相關的命令。
編輯器選項卡上下文選單包含這些預設組
1_close- 與關閉編輯器相關的命令。3_preview- 與固定編輯器相關的命令。
編輯器標題選單包含這些預設組
navigation- 與導航相關的命令。1_run- 與執行和除錯編輯器相關的命令。1_diff- 與處理 diff 編輯器相關的命令。3_open- 與開啟編輯器相關的命令。5_close- 與關閉編輯器相關的命令。
navigation 和 1_run 顯示在主編輯器標題區域。其他組顯示在次要區域——在 ... 選單下。
終端選項卡上下文選單包含這些預設組
1_create- 與建立終端相關的命令。3_run- 與在終端中執行/執行某事相關的命令。5_manage- 與管理終端相關的命令。7_configure- 與終端配置相關的命令。
終端上下文選單包含這些預設組
1_create- 與建立終端相關的命令。3_edit- 與操作文字、選擇或剪貼簿相關的命令。5_clear- 與清空終端相關的命令。7_kill- 與關閉/終止終端相關的命令。9_config- 與終端配置相關的命令。
時間線檢視項上下文選單包含這些預設組
inline- 重要或常用的時間線項命令。渲染為工具欄。1_actions- 與處理時間線項相關的命令。5_copy- 與複製時間線項資訊相關的命令。
擴充套件檢視上下文選單包含這些預設組
1_copy- 與複製擴充套件資訊相關的命令。2_configure- 與配置擴充套件相關的命令。
組內排序
組內的順序取決於標題或 order-attribute。選單項的組內順序透過在組識別符號後追加 @<number> 來指定,如下所示
{
  "editor/title": [
    {
      "when": "editorHasSelection",
      "command": "extension.Command",
      "group": "myGroup@1"
    }
  ]
}
contributes.problemMatchers
貢獻問題匹配器模式。這些貢獻可用於輸出面板執行器和終端執行器。以下是為擴充套件中的 gcc 編譯器貢獻問題匹配器的示例
{
  "contributes": {
    "problemMatchers": [
      {
        "name": "gcc",
        "owner": "cpp",
        "fileLocation": ["relative", "${workspaceFolder}"],
        "pattern": {
          "regexp": "^(.*):(\\d+):(\\d+):\\s+(warning|error):\\s+(.*)$",
          "file": 1,
          "line": 2,
          "column": 3,
          "severity": 4,
          "message": 5
        }
      }
    ]
  }
}
此問題匹配器現在可以透過名稱引用 $gcc 在 tasks.json 檔案中使用。示例如下
{
  "version": "2.0.0",
  "tasks": [
    {
      "label": "build",
      "command": "gcc",
      "args": ["-Wall", "helloWorld.c", "-o", "helloWorld"],
      "problemMatcher": "$gcc"
    }
  ]
}
另請參閱:定義問題匹配器
contributes.problemPatterns
貢獻可用於問題匹配器(見上文)的命名問題模式。
contributes.productIconThemes
向 VS Code 貢獻產品圖示主題。產品圖示是 VS Code 中使用的所有圖示,不包括檔案圖示和從擴充套件貢獻的圖示。
您必須指定一個 id(在設定中使用)、一個 label 和圖示定義檔案的路徑。
產品圖示主題示例
{
  "contributes": {
    "productIconThemes": [
      {
        "id": "elegant",
        "label": "Elegant Icon Theme",
        "path": "./producticons/elegant-product-icon-theme.json"
      }
    ]
  }
}
![]()
有關如何建立產品圖示主題,請參閱產品圖示主題指南。
contributes.resourceLabelFormatters
貢獻資源標籤格式化器,用於指定如何在工作臺中顯示 URI。例如,擴充套件如何為具有 remotehub 方案的 URI 貢獻格式化器
{
  "contributes": {
    "resourceLabelFormatters": [
      {
        "scheme": "remotehub",
        "formatting": {
          "label": "${path}",
          "separator": "/",
          "workspaceSuffix": "GitHub"
        }
      }
    ]
  }
}
這意味著所有具有 remotehub 方案的 URI 都將僅顯示 URI 的 path 部分,分隔符為 /。具有 remotehub URI 的工作區將在其標籤中顯示 GitHub 字尾。
contributes.semanticTokenModifiers
貢獻新的語義令牌修飾符,可透過主題規則進行高亮顯示。
{
  "contributes": {
    "semanticTokenModifiers": [
      {
        "id": "native",
        "description": "Annotates a symbol that is implemented natively"
      }
    ]
  }
}
有關語義高亮顯示,請參閱語義高亮顯示指南。
contributes.semanticTokenScopes
貢獻語義令牌型別與範圍之間的對映,無論是作為回退還是支援特定語言的主題。
{
  "contributes": {
    "semanticTokenScopes": [
      {
        "language": "typescript",
        "scopes": {
          "property.readonly": ["variable.other.constant.property.ts"]
        }
      }
    ]
  }
}
有關語義高亮顯示,請參閱語義高亮顯示指南。
contributes.semanticTokenTypes
貢獻新的語義令牌型別,可透過主題規則進行高亮顯示。
{
  "contributes": {
    "semanticTokenTypes": [
      {
        "id": "templateType",
        "superType": "type",
        "description": "A template type."
      }
    ]
  }
}
有關語義高亮顯示,請參閱語義高亮顯示指南。
contributes.snippets
為特定語言貢獻片段。language 屬性是語言識別符號,path 是片段檔案的相對路徑,該檔案以VS Code 片段格式定義片段。
以下示例展示了為 Go 語言新增片段。
{
  "contributes": {
    "snippets": [
      {
        "language": "go",
        "path": "./snippets/go.json"
      }
    ]
  }
}
contributes.submenus
貢獻一個子選單作為佔位符,用於貢獻選單項。子選單需要一個 label 以在父選單中顯示。
除了標題,命令還可以定義 VS Code 將在編輯器標題選單欄中顯示的圖示。
子選單示例
{
  "contributes": {
    "submenus": [
      {
        "id": "git.commit",
        "label": "Commit"
      }
    ]
  }
}
contributes.taskDefinitions
貢獻並定義一個物件字面量結構,允許唯一地標識系統中貢獻的任務。任務定義至少有一個 type 屬性,但通常會定義其他屬性。例如,一個代表 package.json 檔案中指令碼的任務定義如下
{
  "taskDefinitions": [
    {
      "type": "npm",
      "required": ["script"],
      "properties": {
        "script": {
          "type": "string",
          "description": "The script to execute"
        },
        "path": {
          "type": "string",
          "description": "The path to the package.json file. If omitted the package.json in the root of the workspace folder is used."
        }
      }
    }
  ]
}
任務定義使用 JSON schema 語法為 required 和 properties 屬性定義。type 屬性定義任務型別。如果上述示例
"type": "npm"將任務定義與 npm 任務相關聯"required": [ "script" ]定義script屬性是必需的。path屬性是可選的。"properties" : { ... }定義附加屬性及其型別。
當擴充套件實際建立任務時,它需要傳遞一個符合 package.json 檔案中貢獻的任務定義的 TaskDefinition。對於 npm 示例,建立 package.json 檔案中測試指令碼的任務如下
let task = new vscode.Task({ type: 'npm', script: 'test' }, ....);
contributes.terminal
向 VS Code 貢獻一個終端配置檔案,允許擴充套件處理配置檔案的建立。定義後,配置檔案應在建立終端配置檔案時出現
{
  "activationEvents": ["onTerminalProfile:my-ext.terminal-profile"],
  "contributes": {
    "terminal": {
      "profiles": [
        {
          "title": "Profile from extension",
          "id": "my-ext.terminal-profile"
        }
      ]
    }
  }
}
定義後,配置檔案將顯示在終端配置檔案選擇器中。啟用時,透過返回終端選項來處理配置檔案的建立
vscode.window.registerTerminalProfileProvider('my-ext.terminal-profile', {
  provideTerminalProfile(
    token: vscode.CancellationToken
  ): vscode.ProviderResult<vscode.TerminalOptions | vscode.ExtensionTerminalOptions> {
    return { name: 'Profile from extension', shellPath: 'bash' };
  }
});
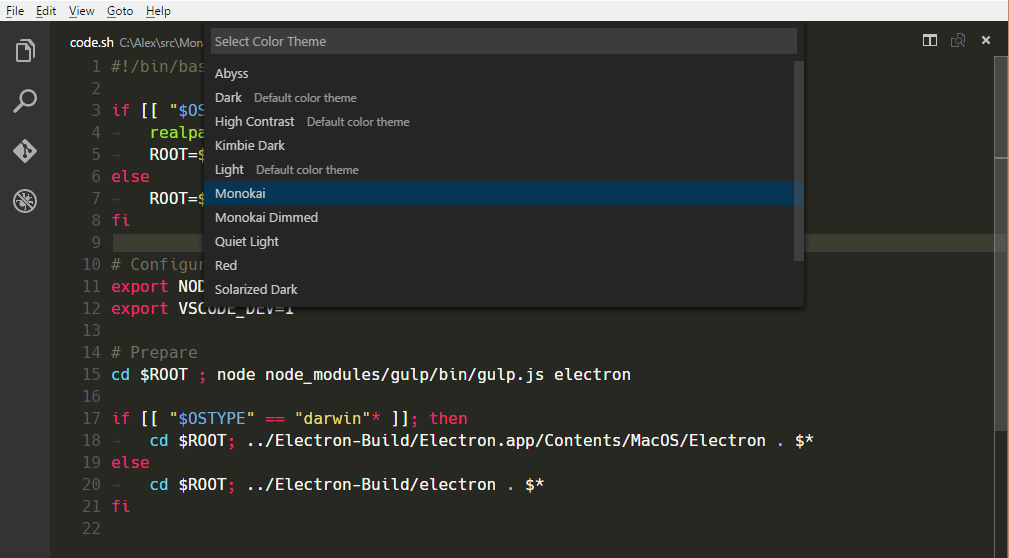
contributes.themes
向 VS Code 貢獻一個顏色主題,定義工作臺顏色和編輯器的語法標記樣式。
您必須指定一個 label,該主題是深色主題還是淺色主題(以便 VS Code 的其餘部分更改以匹配您的主題),以及檔案的路徑(JSON 格式)。
主題示例
{
  "contributes": {
    "themes": [
      {
        "label": "Monokai",
        "uiTheme": "vs-dark",
        "path": "./themes/monokai-color-theme.json"
      }
    ]
  }
}
有關如何建立顏色主題,請參閱顏色主題指南。
contributes.typescriptServerPlugins
貢獻 TypeScript 伺服器外掛,它們會增強 VS Code 的 JavaScript 和 TypeScript 支援
{
  "contributes": {
    "typescriptServerPlugins": [
      {
        "name": "typescript-styled-plugin"
      }
    ]
  }
}
上面的示例擴充套件貢獻了 typescript-styled-plugin,它為 JavaScript 和 TypeScript 添加了 styled-component IntelliSense。此外掛將從擴充套件載入,並且必須作為擴充套件中的常規 NPM dependency 安裝
{
  "dependencies": {
    "typescript-styled-plugin": "*"
  }
}
當用戶使用 VS Code 的 TypeScript 版本時,TypeScript 伺服器外掛將為所有 JavaScript 和 TypeScript 檔案載入。如果使用者使用工作區的 TypeScript 版本,它們不會被啟用,除非外掛明確設定了 "enableForWorkspaceTypeScriptVersions": true。
{
  "contributes": {
    "typescriptServerPlugins": [
      {
        "name": "typescript-styled-plugin",
        "enableForWorkspaceTypeScriptVersions": true
      }
    ]
  }
}
外掛配置
擴充套件可以透過 VS Code 內建 TypeScript 擴充套件提供的 API 將配置資料傳送到貢獻的 TypeScript 外掛
// In your VS Code extension

export async function activate(context: vscode.ExtensionContext) {
  // Get the TS extension
  const tsExtension = vscode.extensions.getExtension('vscode.typescript-language-features');
  if (!tsExtension) {
    return;
  }

  await tsExtension.activate();

  // Get the API from the TS extension
  if (!tsExtension.exports || !tsExtension.exports.getAPI) {
    return;
  }

  const api = tsExtension.exports.getAPI(0);
  if (!api) {
    return;
  }

  // Configure the 'my-typescript-plugin-id' plugin
  api.configurePlugin('my-typescript-plugin-id', {
    someValue: process.env['SOME_VALUE']
  });
}
TypeScript 伺服器外掛透過 onConfigurationChanged 方法接收配置資料
// In your TypeScript plugin

import * as ts_module from 'typescript/lib/tsserverlibrary';

export = function init({ typescript }: { typescript: typeof ts_module }) {
  return {
    create(info: ts.server.PluginCreateInfo) {
      // Create new language service
    },
    onConfigurationChanged(config: any) {
      // Receive configuration changes sent from VS Code
    }
  };
};
此 API 允許 VS Code 擴充套件同步 VS Code 設定與 TypeScript 伺服器外掛,或動態更改外掛的行為。請檢視 TypeScript TSLint 外掛和 lit-html 擴充套件,瞭解這些 API 的實際用法。
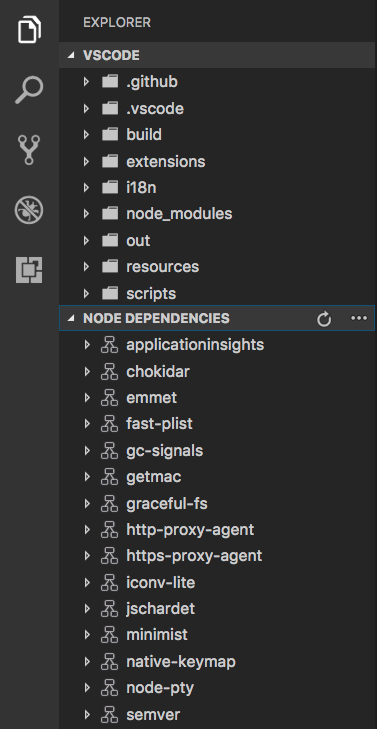
contributes.views
向 VS Code 貢獻一個檢視。您必須為檢視指定一個識別符號和名稱。您可以向以下檢視容器貢獻
explorer:Activity Bar 中的 Explorer 檢視容器scm:Activity Bar 中的 Source Control Management (SCM) 檢視容器debug:Activity Bar 中的 Run and Debug 檢視容器test:Activity Bar 中的 Test 檢視容器- 擴充套件貢獻的自定義檢視容器。
當用戶開啟檢視時,VS Code 將發出一個 activationEvent onView:${viewId}(下面的示例為 onView:nodeDependencies)。您還可以透過提供 when 上下文值來控制檢視的可見性。指定的 icon 將在無法顯示標題時使用(例如,當檢視被拖到 Activity Bar 時)。contextualTitle 用於檢視移出其預設檢視容器並需要附加上下文時。
{
  "contributes": {
    "views": {
      "explorer": [
        {
          "id": "nodeDependencies",
          "name": "Node Dependencies",
          "when": "workspaceHasPackageJSON",
          "icon": "media/dep.svg",
          "contextualTitle": "Package Explorer"
        }
      ]
    }
  }
}
檢視的內容可以透過兩種方式填充
- 使用 TreeView,透過
createTreeViewAPI 提供 data provider,或者直接透過registerTreeDataProviderAPI 註冊 data provider 來填充資料。TreeView 非常適合顯示分層資料和列表。請參閱tree-view-sample。 - 使用 WebviewView,透過
registerWebviewViewProvider註冊 provider。Webview 檢視允許在檢視中渲染任意 HTML。有關更多詳細資訊,請參閱webview view sample extension。
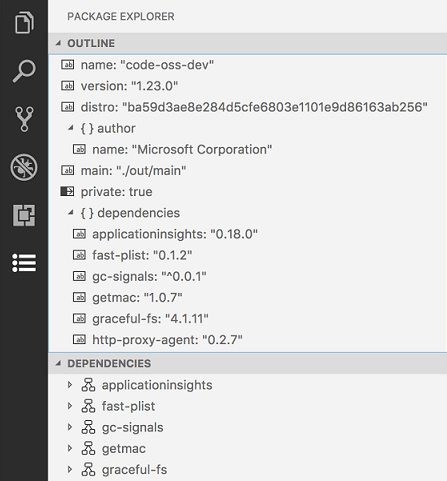
contributes.viewsContainers
貢獻一個檢視容器,用於貢獻自定義檢視。您必須為檢視容器指定識別符號、標題和圖示。目前,您可以將它們貢獻到 Activity Bar (activitybar) 和 Panel (panel)。下面的示例顯示了 Package Explorer 檢視容器如何被貢獻到 Activity Bar,以及檢視如何被貢獻到其中。
{
  "contributes": {
    "viewsContainers": {
      "activitybar": [
        {
          "id": "package-explorer",
          "title": "Package Explorer",
          "icon": "resources/package-explorer.svg"
        }
      ]
    },
    "views": {
      "package-explorer": [
        {
          "id": "package-dependencies",
          "name": "Dependencies"
        },
        {
          "id": "package-outline",
          "name": "Outline"
        }
      ]
    }
  }
}
圖示規範
-
尺寸:圖示應為 24x24 畫素,並居中。 -
顏色:圖示應使用單一顏色。 -
格式:建議圖示為 SVG,但接受任何影像檔案型別。 -
狀態:所有圖示都繼承以下狀態樣式狀態 不透明度 預設值 60% Hover 100% 活動 100%
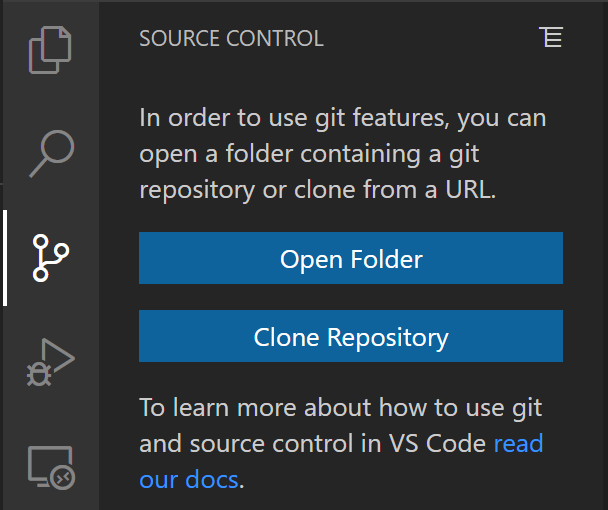
contributes.viewsWelcome
向自定義檢視貢獻歡迎內容。歡迎內容僅適用於空的樹檢視。當樹沒有子節點且沒有 TreeView.message 時,檢視被視為為空。按照約定,任何單獨成行的命令連結都顯示為按鈕。您可以使用 view 屬性指定歡迎內容適用的檢視。歡迎內容的可見性可以透過 when 上下文值來控制。要顯示為歡迎內容的文字透過 contents 屬性設定。
{
  "contributes": {
    "viewsWelcome": [
      {
        "view": "scm",
        "contents": "In order to use git features, you can open a folder containing a git repository or clone from a URL.\n[Open Folder](command:vscode.openFolder)\n[Clone Repository](command:git.clone)\nTo learn more about how to use git and source control in VS Code [read our docs](https://aka.ms/vscode-scm).",
        "when": "config.git.enabled && git.state == initialized && workbenchState == empty"
      }
    ]
  }
}
可以為同一檢視貢獻多個歡迎內容項。當發生這種情況時,來自 VS Code 核心的內容首先出現,然後是來自內建擴充套件的內容,最後是來自所有其他擴充套件的內容。
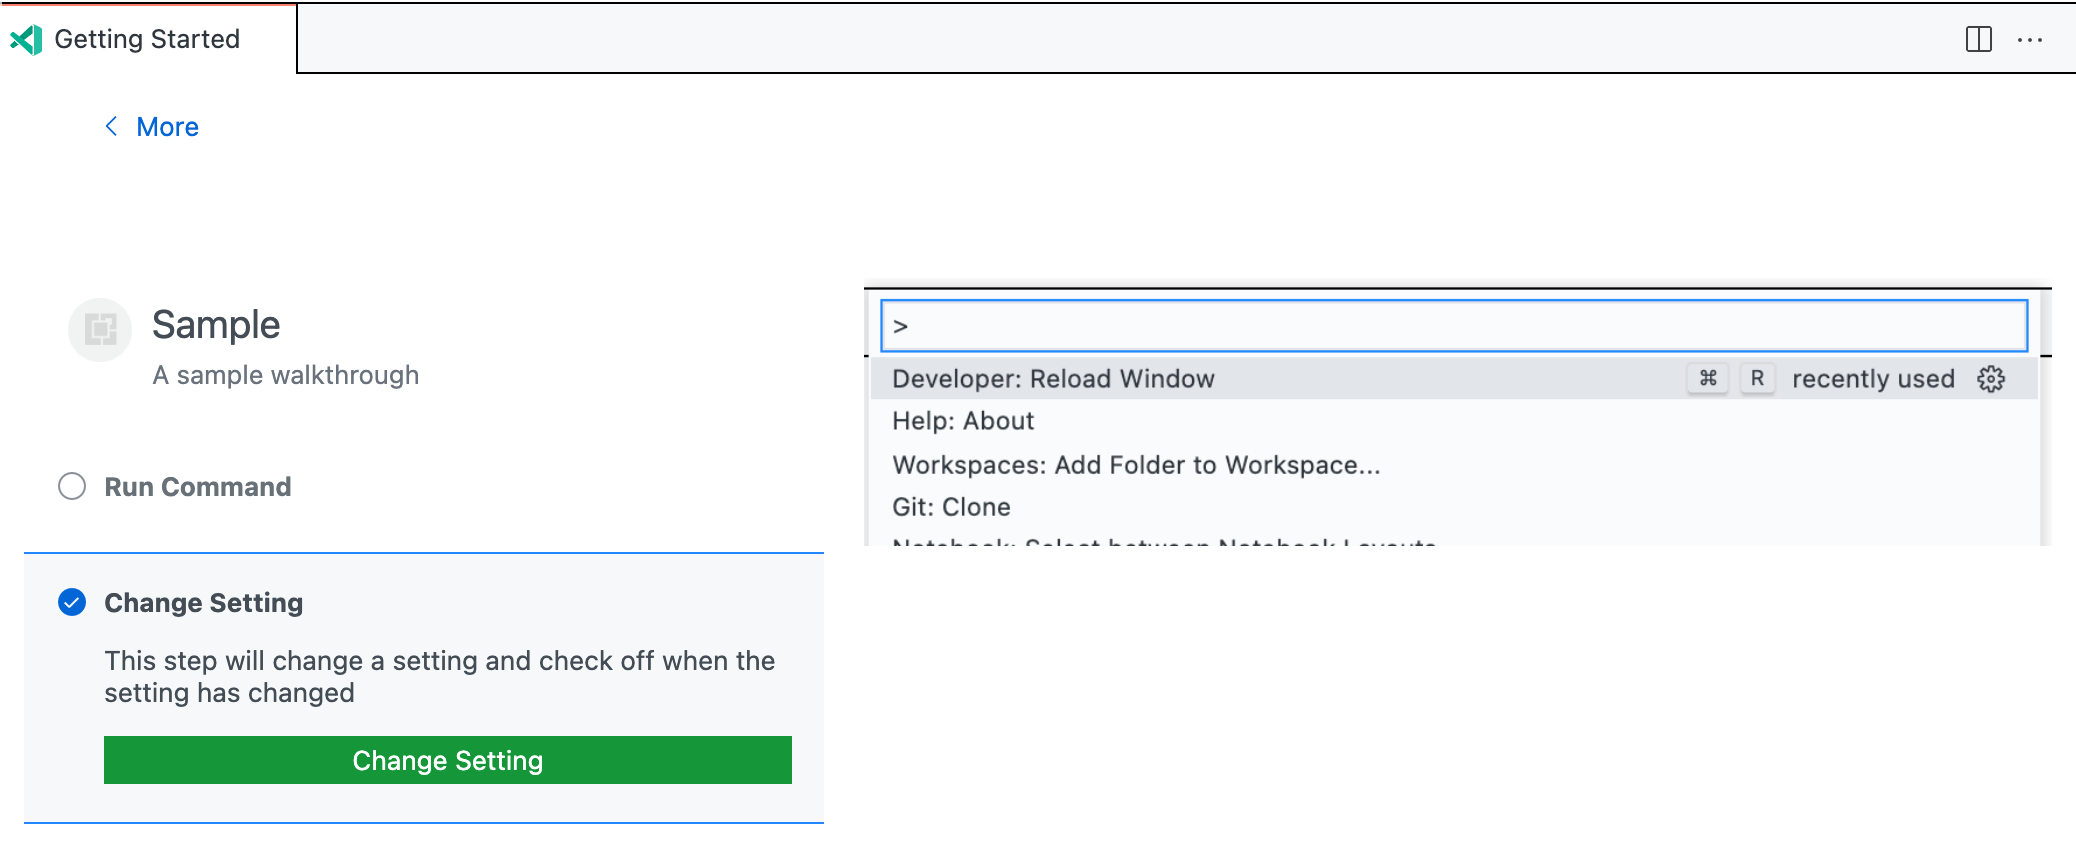
contributes.walkthroughs
將演練內容貢獻到“入門”頁面。演練會在您的擴充套件安裝時自動開啟,並提供一種便捷的方式來向用戶介紹您擴充套件的功能。
演練內容包括標題、描述、id 和一系列步驟。此外,可以設定 when 條件來根據上下文鍵顯示或隱藏演練。例如,解釋 Linux 平臺設定的演練可以指定 when: "isLinux",使其僅出現在 Linux 計算機上。
演練中的每個步驟都有一個標題、描述、id 和媒體元素(影像或 Markdown 內容),以及一組可選的事件,這些事件將導致該步驟被選中(如下例所示)。步驟描述是 Markdown 內容,支援 **粗體**、__下劃線__ 和 ``程式碼`` 渲染,以及連結。與演練內容類似,步驟可以根據上下文鍵設定 when 條件來顯示或隱藏它們。
建議使用 SVG 作為影像,因為它們可以縮放並且支援 VS Code 的主題顏色。使用 Visual Studio Code Color Mapper Figma 外掛在 SVG 中輕鬆引用主題顏色。
{
  "contributes": {
    "walkthroughs": [
      {
        "id": "sample",
        "title": "Sample",
        "description": "A sample walkthrough",
        "steps": [
          {
            "id": "runcommand",
            "title": "Run Command",
            "description": "This step will run a command and check off once it has been run.\n[Run Command](command:getting-started-sample.runCommand)",
            "media": { "image": "media/image.png", "altText": "Empty image" },
            "completionEvents": ["onCommand:getting-started-sample.runCommand"]
          },
          {
            "id": "changesetting",
            "title": "Change Setting",
            "description": "This step will change a setting and check off when the setting has changed\n[Change Setting](command:getting-started-sample.changeSetting)",
            "media": { "markdown": "media/markdown.md" },
            "completionEvents": ["onSettingChanged:getting-started-sample.sampleSetting"]
          }
        ]
      }
    ]
  }
}
完成事件
預設情況下,如果未提供 completionEvents 事件,則在單擊任何按鈕時,或者如果步驟沒有按鈕,則在開啟步驟時,該步驟將被選中。如果需要更精細地控制,可以提供 completionEvents 列表。
可用的完成事件包括
onCommand:myCommand.id:執行命令時選中步驟。onSettingChanged:mySetting.id:一旦給定設定被修改,就選中步驟。onContext:contextKeyExpression:當上下文鍵表示式評估為 true 時,選中步驟。extensionInstalled:myExt.id:如果安裝了給定的擴充套件,則選中步驟。onView:myView.id:當給定的檢視可見時,選中步驟。onLink:https://...:當透過演練開啟給定的連結時,選中步驟。
一旦步驟被選中,它將保持選中狀態,直到使用者顯式取消選中該步驟或重置其進度(透過Getting Started: Reset Progress命令)。