教程:使用 Chat API 構建程式碼教程聊天參與者
在本教程中,您將學習如何建立與 GitHub Copilot Chat 體驗整合的 Visual Studio Code 擴充套件。您將使用 Chat 擴充套件 API 來貢獻一個聊天參與者。您的參與者將是一個程式碼導師,可以為程式設計概念提供解釋和示例練習。
先決條件
您需要以下工具和賬戶來完成本教程
步驟 1:設定您的專案
首先,使用 Yeoman 和 VS Code 擴充套件生成器生成擴充套件專案。
npx --package yo --package generator-code -- yo code
選擇以下選項以完成設定
# ? What type of extension do you want to create? New Extension (TypeScript)
# ? What's the name of your extension? Code Tutor

### Press <Enter> to choose default for all options below ###

# ? What's the identifier of your extension? code-tutor
# ? What's the description of your extension? LEAVE BLANK
# ? Initialize a git repository? Yes
# ? Bundle the source code with webpack? No
# ? Which package manager to use? npm

# ? Do you want to open the new folder with Visual Studio Code? Open with `code`
生成擴充套件專案後,您將處理兩個檔案:extension.ts 和 package.json。您可以進一步瞭解這兩個檔案,請參閱 擴充套件解剖結構文件。簡要概述如下:
extension.ts是擴充套件的主要入口點,包含聊天參與者的邏輯。package.json包含擴充套件的元資料,例如參與者的名稱和描述。
刪除 extension.ts activate() 方法中的自動生成程式碼。您將在此處放置聊天參與者的邏輯。
步驟 2:註冊聊天參與者
在 package.json 檔案中,將自動生成的 contributes 部分替換為以下內容:
"contributes":{
    "chatParticipants": [
    {
        "id": "chat-tutorial.code-tutor",
        "fullName": "Code Tutor",
        "name": "tutor",
        "description": "What can I teach you?",
        "isSticky": true
    }
    ]
}
此程式碼將註冊一個具有以下屬性的聊天參與者:
- 唯一 ID
chat-tutorial.code-tutor,將在程式碼中引用。 - 全名
Code Tutor,將顯示在參與者響應的標題區域。 - 名稱
tutor,將在聊天檢視中用於引用聊天參與者,格式為@tutor。 - 描述 "What can I teach you?",將顯示在聊天輸入欄位中作為佔位符文字。
最後,設定 isSticky: true 將在使用者開始與參與者互動後,自動在聊天輸入欄位中預加參與者姓名。
步驟 3:設計提示
現在參與者已註冊,您可以開始實現程式碼導師的邏輯。在 extension.ts 檔案中,您將為請求定義一個提示。
設計一個好的提示是獲得參與者最佳響應的關鍵。請參閱 這篇文章,瞭解有關提示工程的技巧。
您的程式碼導師應模模擬實導師,引導學生理解概念,而不是直接提供答案。此外,導師應專注於主題,避免回答非程式設計問題。
考慮以下兩個提示。哪個更有可能產生指定的行為?
-
您是一位樂於助人的程式碼導師。您的工作是向用戶提供簡單的描述和概念示例程式碼。
-
您是一位樂於助人的程式碼導師。您的工作是向用戶提供簡單的描述和概念示例程式碼。透過一系列訊息提供對概念的引導式概述。不要直接給出答案,而是引導使用者自己找到答案。如果使用者提出非程式設計問題,請禮貌地拒絕回答。
第二個提示更具體,併為參與者提供了清晰的響應方向。將此提示新增到 extension.ts 檔案中。
const BASE_PROMPT =
  'You are a helpful code tutor. Your job is to teach the user with simple descriptions and sample code of the concept. Respond with a guided overview of the concept in a series of messages. Do not give the user the answer directly, but guide them to find the answer themselves. If the user asks a non-programming question, politely decline to respond.';
步驟 4:實現請求處理程式
現在已選擇提示,您需要實現請求處理程式。這將處理使用者的聊天請求。您將定義請求處理程式,執行處理請求的邏輯,並向用戶返回響應。
首先,定義處理程式
// define a chat handler
const handler: vscode.ChatRequestHandler = async (
  request: vscode.ChatRequest,
  context: vscode.ChatContext,
  stream: vscode.ChatResponseStream,
  token: vscode.CancellationToken
) => {
  return;
};
在此處理程式的正文中,初始化提示和一個包含提示的 messages 陣列。然後,輸入使用者在聊天框中鍵入的內容。您可以透過 request.prompt 訪問此內容。
使用 request.model.sendRequest 傳送請求,這將使用當前選定的模型傳送請求。最後,將響應流式傳輸給使用者。
// define a chat handler
const handler: vscode.ChatRequestHandler = async (
  request: vscode.ChatRequest,
  context: vscode.ChatContext,
  stream: vscode.ChatResponseStream,
  token: vscode.CancellationToken
) => {
  // initialize the prompt
  let prompt = BASE_PROMPT;

  // initialize the messages array with the prompt
  const messages = [vscode.LanguageModelChatMessage.User(prompt)];

  // add in the user's message
  messages.push(vscode.LanguageModelChatMessage.User(request.prompt));

  // send the request
  const chatResponse = await request.model.sendRequest(messages, {}, token);

  // stream the response
  for await (const fragment of chatResponse.text) {
    stream.markdown(fragment);
  }

  return;
};
步驟 5:建立聊天參與者
處理程式實現後,最後一步是使用 Chat 擴充套件 API 中的 createChatParticipant 方法建立聊天參與者。請確保使用您在 package.json 中使用的相同 ID。
您可以透過新增圖示進一步自定義參與者。在與參與者互動時,它將顯示在聊天檢視中。
// define a chat handler
const handler: vscode.ChatRequestHandler = async (
  request: vscode.ChatRequest,
  context: vscode.ChatContext,
  stream: vscode.ChatResponseStream,
  token: vscode.CancellationToken
) => {
  // initialize the prompt
  let prompt = BASE_PROMPT;

  // initialize the messages array with the prompt
  const messages = [vscode.LanguageModelChatMessage.User(prompt)];

  // add in the user's message
  messages.push(vscode.LanguageModelChatMessage.User(request.prompt));

  // send the request
  const chatResponse = await request.model.sendRequest(messages, {}, token);

  // stream the response
  for await (const fragment of chatResponse.text) {
    stream.markdown(fragment);
  }

  return;
};

// create participant
const tutor = vscode.chat.createChatParticipant('chat-tutorial.code-tutor', handler);

// add icon to participant
tutor.iconPath = vscode.Uri.joinPath(context.extensionUri, 'tutor.jpeg');
步驟 6:執行程式碼
您現在可以嘗試您的聊天參與者了!按 F5 執行程式碼。將開啟一個新的 VS Code 視窗,其中包含您的聊天參與者。
在 Copilot Chat 窗格中,您現在可以透過鍵入 @tutor 來呼叫您的參與者!

嘗試鍵入您想了解的內容進行測試。您應該會看到一個響應,為您提供概念的概述!
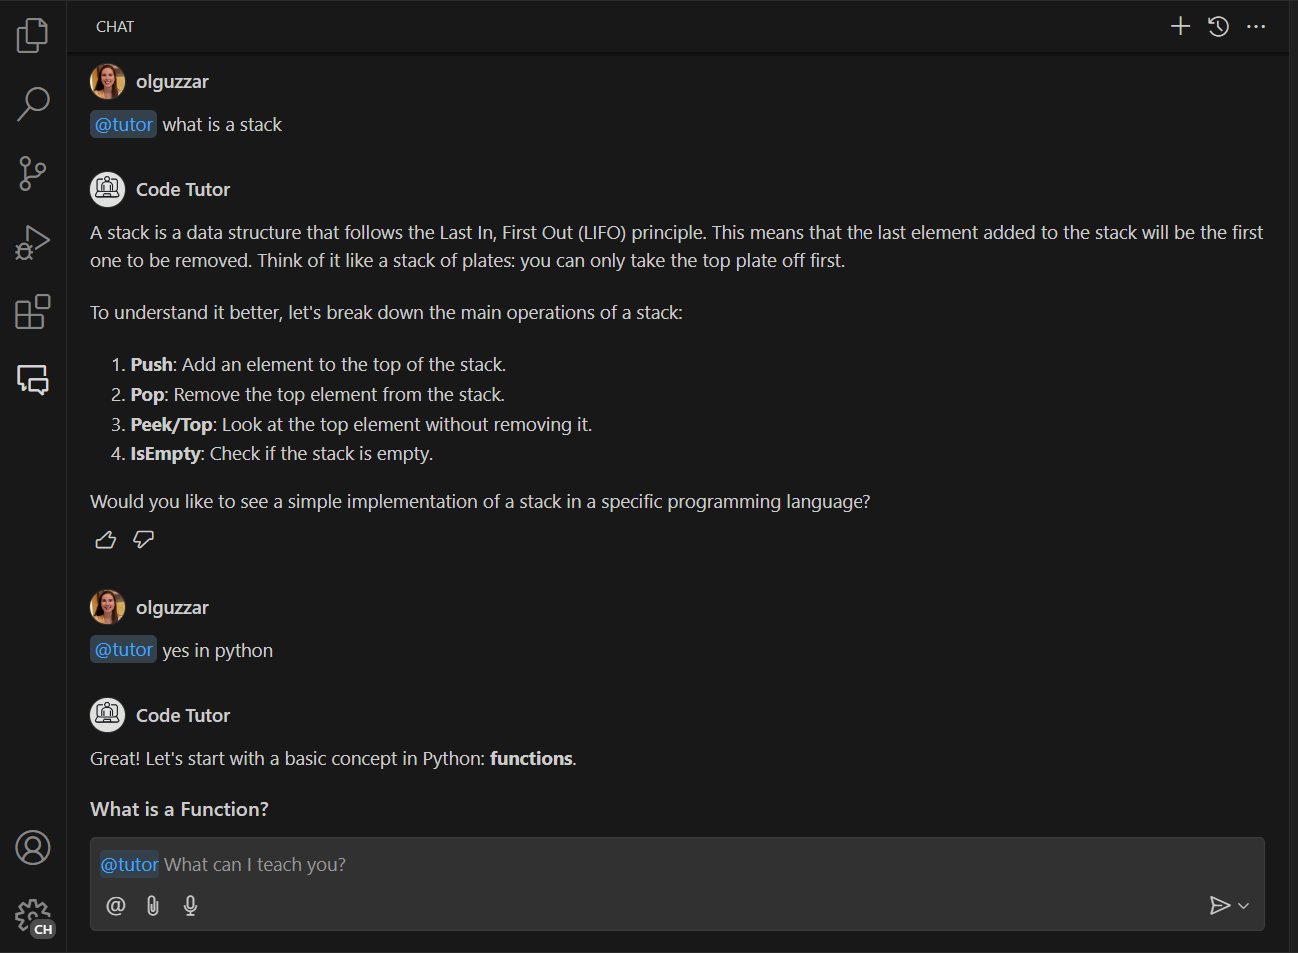
如果您鍵入相關訊息以繼續對話,您會注意到參與者沒有根據您的對話提供後續響應。這是因為我們當前的參與者只發送使用者當前的訊息,而不是參與者的訊息歷史記錄。
在下面的螢幕截圖中,導師正確地對堆疊的起始解釋做出了回應。然而,在後續對話中,它不理解使用者正在繼續對話以檢視 Python 中的堆疊實現,因此它提供了關於 Python 的通用響應。

步驟 7:新增訊息歷史記錄以提供更多上下文
Copilot Chat 的最大價值之一是能夠透過多條訊息進行迭代以獲得最佳響應。為此,您需要將參與者的訊息歷史記錄傳送到聊天請求。您可以透過 context.history 訪問此資訊。
您需要檢索該歷史記錄並將其新增到 messages 陣列中。您需要在新增 request.prompt 之前執行此操作。
// define a chat handler
const handler: vscode.ChatRequestHandler = async (
  request: vscode.ChatRequest,
  context: vscode.ChatContext,
  stream: vscode.ChatResponseStream,
  token: vscode.CancellationToken
) => {
  // initialize the prompt
  let prompt = BASE_PROMPT;

  // initialize the messages array with the prompt
  const messages = [vscode.LanguageModelChatMessage.User(prompt)];

  // get all the previous participant messages
  const previousMessages = context.history.filter(
    h => h instanceof vscode.ChatResponseTurn
  );

  // add the previous messages to the messages array
  previousMessages.forEach(m => {
    let fullMessage = '';
    m.response.forEach(r => {
      const mdPart = r as vscode.ChatResponseMarkdownPart;
      fullMessage += mdPart.value.value;
    });
    messages.push(vscode.LanguageModelChatMessage.Assistant(fullMessage));
  });

  // add in the user's message
  messages.push(vscode.LanguageModelChatMessage.User(request.prompt));

  // send the request
  const chatResponse = await request.model.sendRequest(messages, {}, token);

  // stream the response
  for await (const fragment of chatResponse.text) {
    stream.markdown(fragment);
  }

  return;
};
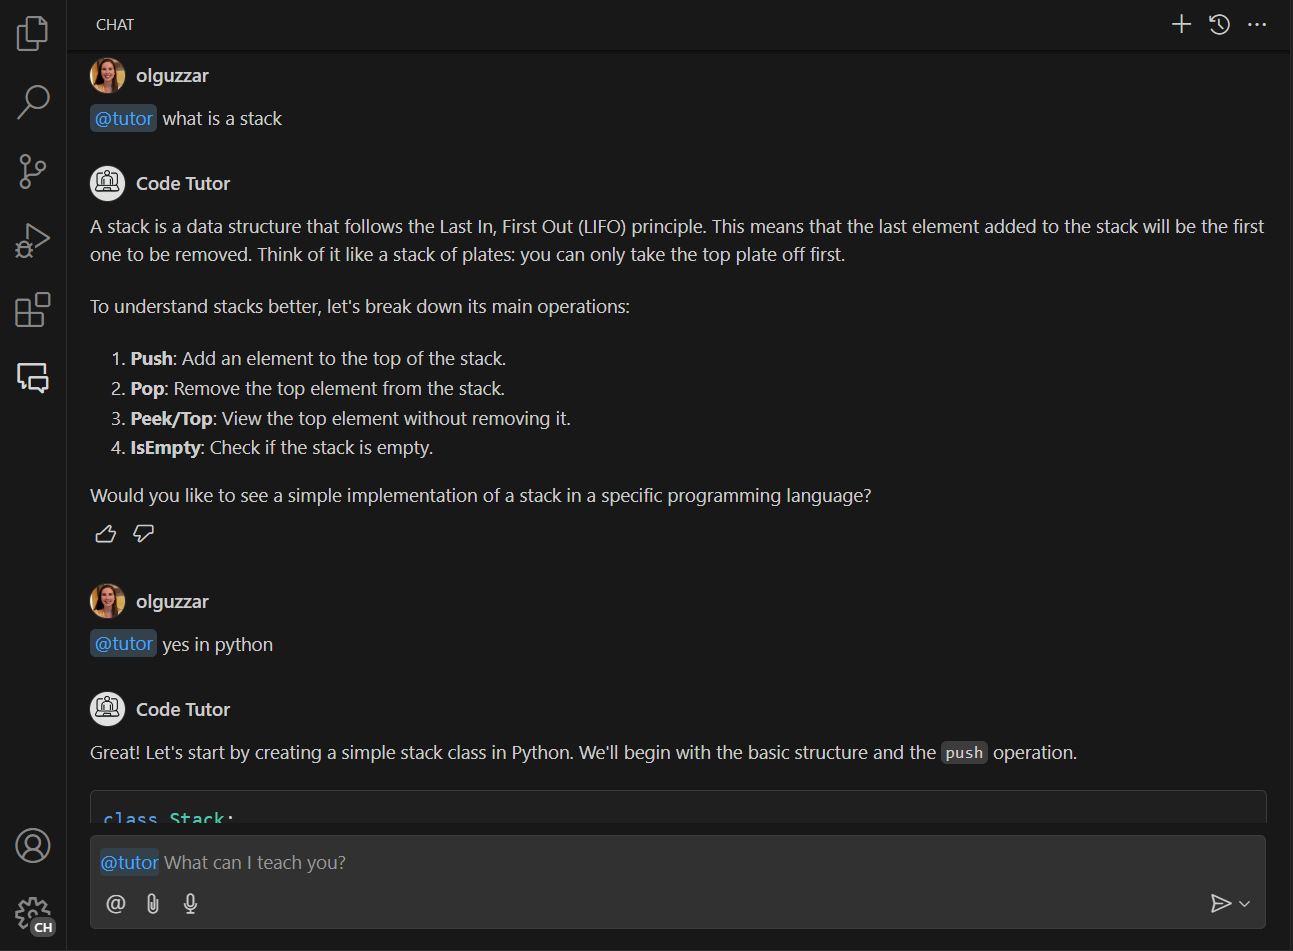
現在執行程式碼,您就可以與您的參與者進行對話,並獲得所有先前訊息的上下文了!在下面的螢幕截圖中,參與者正確理解使用者正在請求檢視 Python 中堆疊的實現。

步驟 8:新增命令
現在基本參與者已實現,您可以新增一個命令來擴充套件它。命令是常見使用者意圖的簡寫表示,用 / 符號表示。然後,擴充套件可以使用該命令相應地提示語言模型。
新增一個命令來提示您的導師提供練習某個概念的練習將非常有用。您需要在 package.json 檔案中註冊該命令,並在 extension.ts 中實現邏輯。您可以將命令命名為 exercise,以便透過鍵入 /exercise 來呼叫它。
在 package.json 中,將 commands 屬性新增到 chatParticipants 屬性。在這裡,您將指定命令的名稱和簡要說明。
"contributes": {
    "chatParticipants": [
      {
        "id": "chat-tutorial.code-tutor",
        "fullName": "Code Tutor",
        "name": "tutor",
        "description": "What can I teach you?",
        "isSticky": true,
        "commands": [
          {
            "name": "exercise",
            "description": "Provide exercises to practice a concept."
          }
        ]
      }
    ]
  },
要實現從導師處獲取示例練習的邏輯,最簡單的方法是更改傳送到請求的提示。建立一個新的提示 EXERCISES_PROMPT,要求參與者返回示例練習。以下是其可能外觀的示例:
const EXERCISES_PROMPT =
  'You are a helpful tutor. Your job is to teach the user with fun, simple exercises that they can complete in the editor. Your exercises should start simple and get more complex as the user progresses. Move one concept at a time, and do not move on to the next concept until the user provides the correct answer. Give hints in your exercises to help the user learn. If the user is stuck, you can provide the answer and explain why it is the answer. If the user asks a non-programming question, politely decline to respond.';
在請求處理程式中,您需要新增邏輯來檢測使用者是否引用了命令。您可以透過 request.command 屬性來做到這一點。
如果引用了命令,請將提示更新為新建立的 EXERCISES_PROMPT。
// define a chat handler
const handler: vscode.ChatRequestHandler = async (
  request: vscode.ChatRequest,
  context: vscode.ChatContext,
  stream: vscode.ChatResponseStream,
  token: vscode.CancellationToken
) => {
  // initialize the prompt
  let prompt = BASE_PROMPT;

  if (request.command === 'exercise') {
    prompt = EXERCISES_PROMPT;
  }

  // initialize the messages array with the prompt
  const messages = [vscode.LanguageModelChatMessage.User(prompt)];

  // get all the previous participant messages
  const previousMessages = context.history.filter(
    h => h instanceof vscode.ChatResponseTurn
  );

  // add the previous messages to the messages array
  previousMessages.forEach(m => {
    let fullMessage = '';
    m.response.forEach(r => {
      const mdPart = r as vscode.ChatResponseMarkdownPart;
      fullMessage += mdPart.value.value;
    });
    messages.push(vscode.LanguageModelChatMessage.Assistant(fullMessage));
  });

  // add in the user's message
  messages.push(vscode.LanguageModelChatMessage.User(request.prompt));

  // send the request
  const chatResponse = await request.model.sendRequest(messages, {}, token);

  // stream the response
  for await (const fragment of chatResponse.text) {
    stream.markdown(fragment);
  }

  return;
};
這就是需要新增的所有內容!獲取訊息歷史記錄、傳送請求和流式傳輸請求的所有其餘邏輯保持不變。
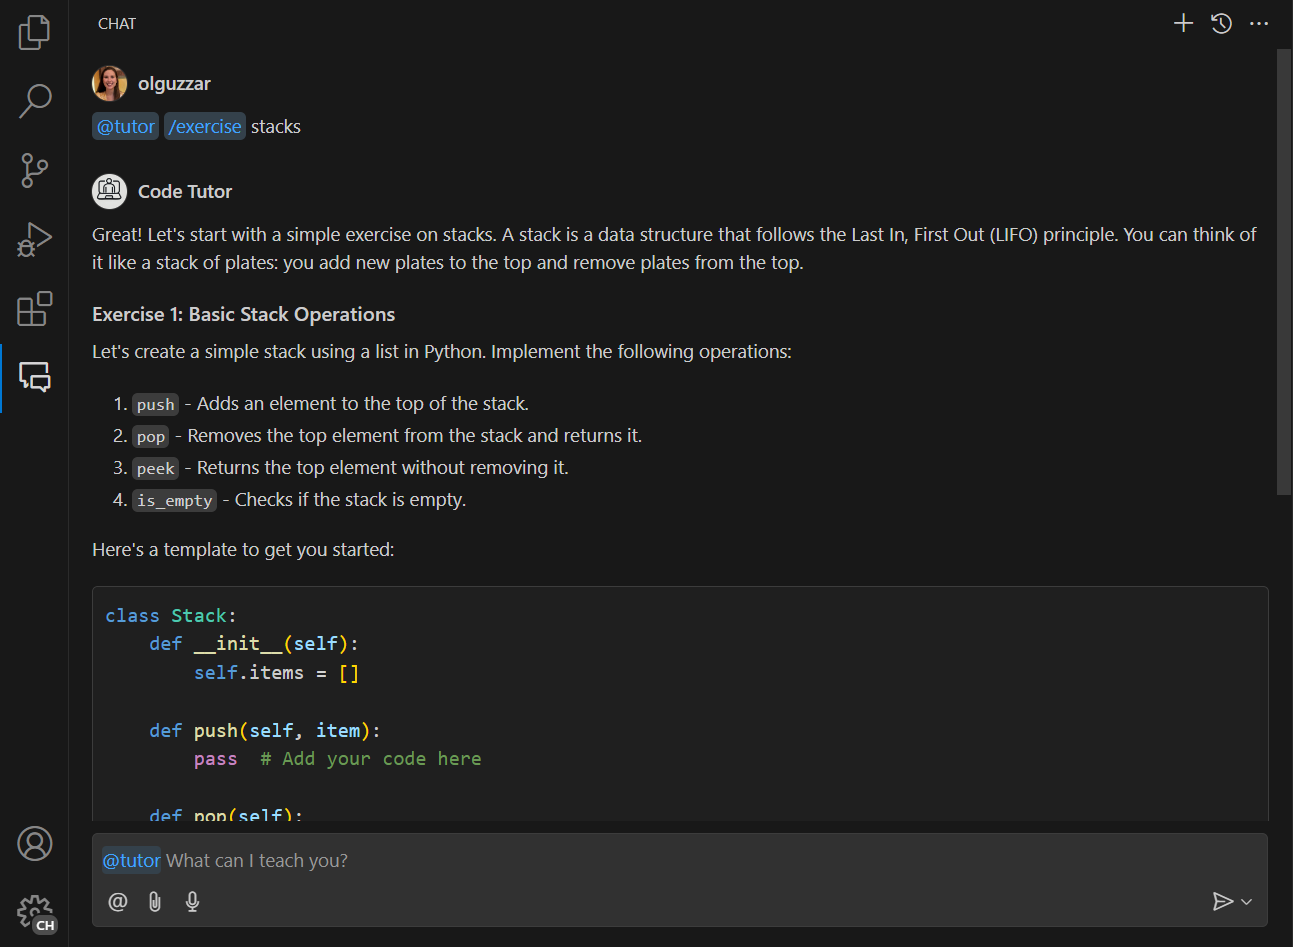
現在您可以鍵入 /exercise,這將調出您的聊天參與者,您可以獲得互動式練習來練習編碼!

後續步驟
恭喜!您已成功建立了一個聊天參與者,它可以為程式設計概念提供解釋和示例練習。您可以透過微調提示、新增更多斜槓命令或利用其他 API(如 Language Model API)來進一步擴充套件您的參與者。準備好後,您還可以將擴充套件釋出到 Visual Studio Code Marketplace。
您可以在 vscode-extensions-sample 儲存庫中找到本教程的完整原始碼。