樹檢視 API
樹檢視 API 允許擴充套件在 Visual Studio Code 的側邊欄中顯示內容。此內容被結構化為樹,並符合 VS Code 內建檢視的樣式。
例如,內建的“查詢所有引用”檢視擴充套件將引用搜索結果顯示為一個單獨的檢視。
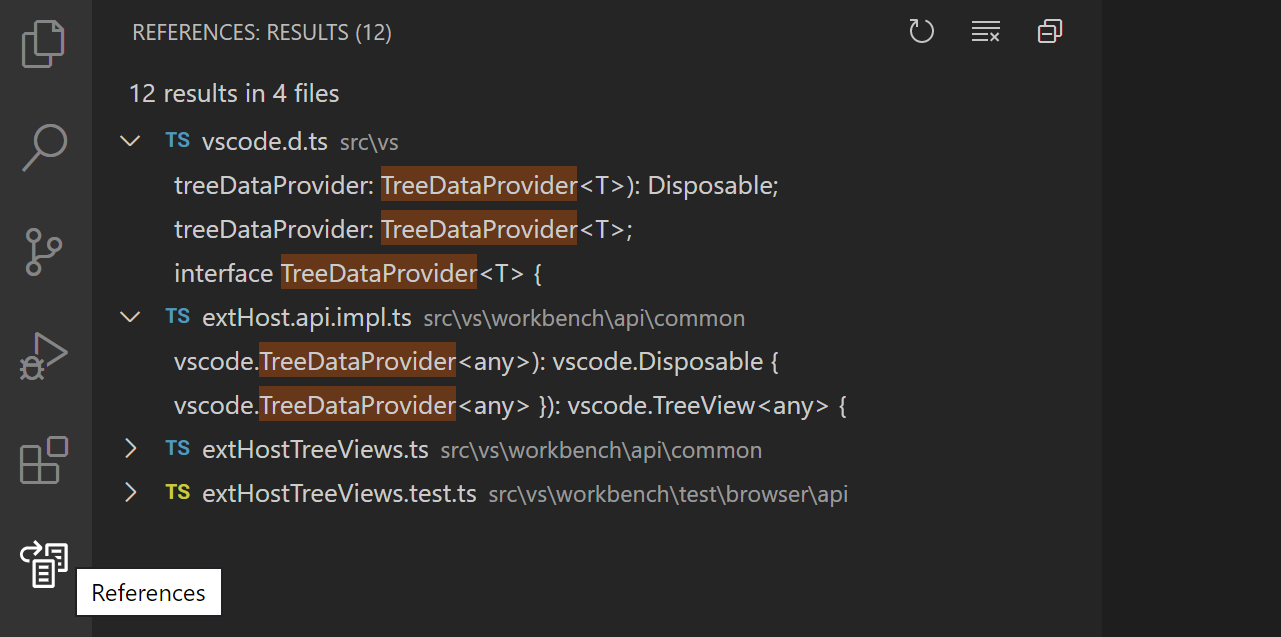
“查詢所有引用”的結果顯示在“引用: 結果”樹檢視中,該檢視位於“引用”檢視容器中。
本指南將教您如何編寫一個向 Visual Studio Code 貢獻樹檢視和檢視容器的擴充套件。
樹檢視 API 基礎知識
為了解釋樹檢視 API,我們將構建一個名為“節點依賴項”的示例擴充套件。此擴充套件將使用樹檢視來顯示當前資料夾中的所有 Node.js 依賴項。新增樹檢視的步驟是在 package.json 中貢獻該樹檢視,建立 TreeDataProvider,然後註冊 TreeDataProvider。您可以在 vscode-extension-samples GitHub 儲存庫的 tree-view-sample 中找到此示例擴充套件的完整原始碼。
package.json 貢獻
首先,您需要透過在 package.json 中使用 contributes.views 貢獻點來告知 VS Code 您正在貢獻一個檢視。
這是我們擴充套件第一個版本的 package.json
{
  "name": "custom-view-samples",
  "displayName": "Custom view Samples",
  "description": "Samples for VS Code's view API",
  "version": "0.0.1",
  "publisher": "alexr00",
  "engines": {
    "vscode": "^1.74.0"
  },
  "activationEvents": [],
  "main": "./out/extension.js",
  "contributes": {
    "views": {
      "explorer": [
        {
          "id": "nodeDependencies",
          "name": "Node Dependencies"
        }
      ]
    }
  },
  "scripts": {
    "vscode:prepublish": "npm run compile",
    "compile": "tsc -p ./",
    "watch": "tsc -watch -p ./"
  },
  "devDependencies": {
    "@types/node": "^10.12.21",
    "@types/vscode": "^1.42.0",
    "typescript": "^3.5.1",
    "tslint": "^5.12.1"
  }
}
注意:如果您的擴充套件針對的是 1.74 之前的 VS Code 版本,您必須在
activationEvents中明確列出onView:nodeDependencies。
您必須為檢視指定一個識別符號和名稱,並且可以貢獻到以下位置:
explorer:側邊欄中的“資源管理器”檢視。debug:側邊欄中的“執行和除錯”檢視。scm:側邊欄中的“原始碼管理”檢視。test:側邊欄中的“測試資源管理器”檢視。- 自定義檢視容器
樹資料提供程式
第二步是為您註冊的檢視提供資料,以便 VS Code 可以顯示資料。為此,您應該首先實現 TreeDataProvider。我們的 TreeDataProvider 將提供節點依賴項資料,但您可以擁有一個提供其他型別資料的提供程式。
此 API 中有兩個必須實現的方法:
getChildren(element?: T): ProviderResult<T[]>- 實現此方法以返回給定element或根(如果未傳遞元素)的子級。getTreeItem(element: T): TreeItem | Thenable<TreeItem>- 實現此方法以返回將在檢視中顯示的元素的 UI 表示(TreeItem)。
當用戶開啟樹檢視時,將呼叫不帶 element 的 getChildren 方法。從那裡,您的 TreeDataProvider 應該返回您的頂級樹專案。在我們的示例中,頂級樹專案的 collapsibleState 為 TreeItemCollapsibleState.Collapsed,這意味著頂級樹專案將顯示為摺疊狀態。將 collapsibleState 設定為 TreeItemCollapsibleState.Expanded 將導致樹專案顯示為展開狀態。將 collapsibleState 保留為預設值 TreeItemCollapsibleState.None 表示樹專案沒有子級。對於 collapsibleState 為 TreeItemCollapsibleState.None 的樹專案,不會呼叫 getChildren。
這是一個提供節點依賴項資料的 TreeDataProvider 實現示例:
import * as vscode from 'vscode';
import * as fs from 'fs';
import * as path from 'path';

export class NodeDependenciesProvider implements vscode.TreeDataProvider<Dependency> {
  constructor(private workspaceRoot: string) {}

  getTreeItem(element: Dependency): vscode.TreeItem {
    return element;
  }

  getChildren(element?: Dependency): Thenable<Dependency[]> {
    if (!this.workspaceRoot) {
      vscode.window.showInformationMessage('No dependency in empty workspace');
      return Promise.resolve([]);
    }

    if (element) {
      return Promise.resolve(
        this.getDepsInPackageJson(
          path.join(this.workspaceRoot, 'node_modules', element.label, 'package.json')
        )
      );
    } else {
      const packageJsonPath = path.join(this.workspaceRoot, 'package.json');
      if (this.pathExists(packageJsonPath)) {
        return Promise.resolve(this.getDepsInPackageJson(packageJsonPath));
      } else {
        vscode.window.showInformationMessage('Workspace has no package.json');
        return Promise.resolve([]);
      }
    }
  }

  /**
   * Given the path to package.json, read all its dependencies and devDependencies.
   */
  private getDepsInPackageJson(packageJsonPath: string): Dependency[] {
    if (this.pathExists(packageJsonPath)) {
      const toDep = (moduleName: string, version: string): Dependency => {
        if (this.pathExists(path.join(this.workspaceRoot, 'node_modules', moduleName))) {
          return new Dependency(
            moduleName,
            version,
            vscode.TreeItemCollapsibleState.Collapsed
          );
        } else {
          return new Dependency(moduleName, version, vscode.TreeItemCollapsibleState.None);
        }
      };

      const packageJson = JSON.parse(fs.readFileSync(packageJsonPath, 'utf-8'));

      const deps = packageJson.dependencies
        ? Object.keys(packageJson.dependencies).map(dep =>
            toDep(dep, packageJson.dependencies[dep])
          )
        : [];
      const devDeps = packageJson.devDependencies
        ? Object.keys(packageJson.devDependencies).map(dep =>
            toDep(dep, packageJson.devDependencies[dep])
          )
        : [];
      return deps.concat(devDeps);
    } else {
      return [];
    }
  }

  private pathExists(p: string): boolean {
    try {
      fs.accessSync(p);
    } catch (err) {
      return false;
    }
    return true;
  }
}

class Dependency extends vscode.TreeItem {
  constructor(
    public readonly label: string,
    private version: string,
    public readonly collapsibleState: vscode.TreeItemCollapsibleState
  ) {
    super(label, collapsibleState);
    this.tooltip = `${this.label}-${this.version}`;
    this.description = this.version;
  }

  iconPath = {
    light: path.join(__filename, '..', '..', 'resources', 'light', 'dependency.svg'),
    dark: path.join(__filename, '..', '..', 'resources', 'dark', 'dependency.svg')
  };
}
註冊 TreeDataProvider
第三步是將上述資料提供程式註冊到您的檢視。
這可以透過以下兩種方式完成:
-
vscode.window.registerTreeDataProvider- 透過提供註冊的檢視 ID 和上述資料提供程式來註冊樹資料提供程式。const rootPath = vscode.workspace.workspaceFolders && vscode.workspace.workspaceFolders.length > 0 ? vscode.workspace.workspaceFolders[0].uri.fsPath : undefined; vscode.window.registerTreeDataProvider( 'nodeDependencies', new NodeDependenciesProvider(rootPath) ); -
vscode.window.createTreeView- 透過提供註冊的檢視 ID 和上述資料提供程式來建立樹檢視。這將提供對 TreeView 的訪問,您可以使用它來執行其他檢視操作。如果需要TreeViewAPI,請使用createTreeView。vscode.window.createTreeView('nodeDependencies', { treeDataProvider: new NodeDependenciesProvider(rootPath) });
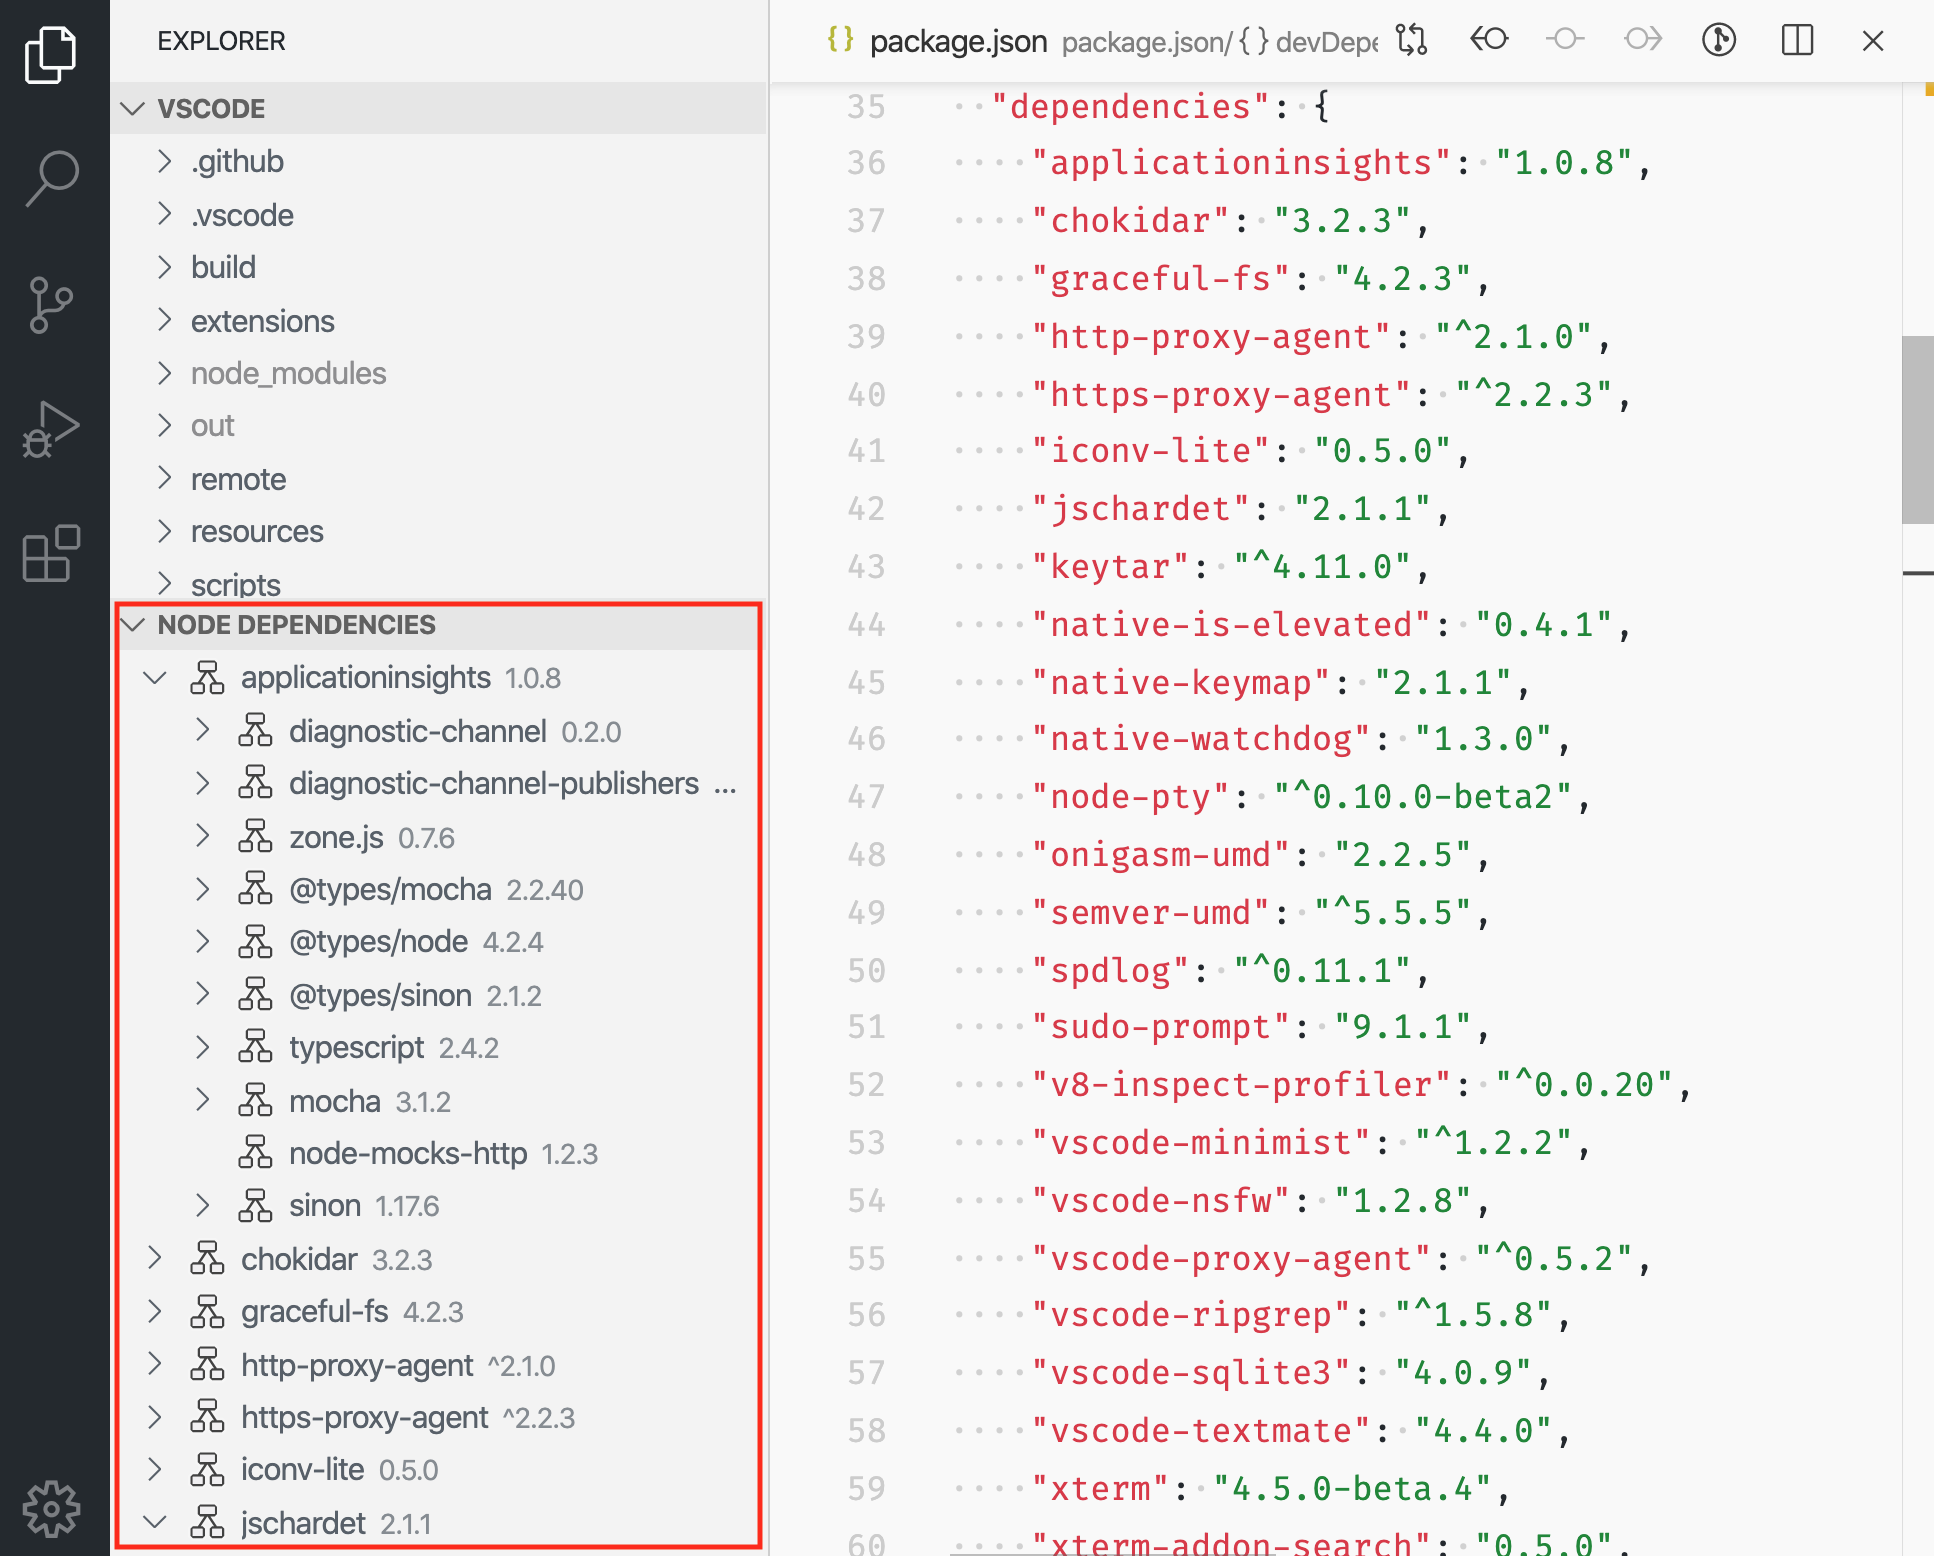
以下是正在執行的擴充套件:
更新樹檢視內容
我們的節點依賴項檢視很簡單,一旦資料顯示出來就不會再更新。但是,在檢視中新增一個重新整理按鈕並使用當前 package.json 的內容更新節點依賴項檢視會很有用。為此,我們可以使用 onDidChangeTreeData 事件。
onDidChangeTreeData?: Event<T | undefined | null | void>- 如果您的樹資料可能發生變化並且您想更新樹檢視,請實現此方法。
將以下內容新增到您的 NodeDependenciesProvider。
  private _onDidChangeTreeData: vscode.EventEmitter<Dependency | undefined | null | void> = new vscode.EventEmitter<Dependency | undefined | null | void>();
  readonly onDidChangeTreeData: vscode.Event<Dependency | undefined | null | void> = this._onDidChangeTreeData.event;

  refresh(): void {
    this._onDidChangeTreeData.fire();
  }
現在我們有了一個重新整理方法,但是沒有人呼叫它。我們可以新增一個命令來呼叫重新整理。
在 package.json 的 contributes 部分,新增:
    "commands": [
            {
                "command": "nodeDependencies.refreshEntry",
                "title": "Refresh",
                "icon": {
                    "light": "resources/light/refresh.svg",
                    "dark": "resources/dark/refresh.svg"
                }
            },
    ]
並在您的擴充套件啟用時註冊該命令:
import * as vscode from 'vscode';
import { NodeDependenciesProvider } from './nodeDependencies';

export function activate(context: vscode.ExtensionContext) {
  const rootPath =
    vscode.workspace.workspaceFolders && vscode.workspace.workspaceFolders.length > 0
      ? vscode.workspace.workspaceFolders[0].uri.fsPath
      : undefined;
  const nodeDependenciesProvider = new NodeDependenciesProvider(rootPath);
  vscode.window.registerTreeDataProvider('nodeDependencies', nodeDependenciesProvider);
  vscode.commands.registerCommand('nodeDependencies.refreshEntry', () =>
    nodeDependenciesProvider.refresh()
  );
}
現在我們有了一個可以重新整理節點依賴項檢視的命令,但是檢視上的按鈕會更好。我們已經為命令添加了一個 icon,所以當我們將其新增到檢視時,它會顯示該圖示。
在 package.json 的 contributes 部分,新增:
"menus": {
    "view/title": [
        {
            "command": "nodeDependencies.refreshEntry",
            "when": "view == nodeDependencies",
            "group": "navigation"
        },
    ]
}
啟用
重要的是,您的擴充套件應該僅在使用者需要您的擴充套件提供的功能時才啟用。在這種情況下,您應該只在使用者開始使用該檢視時啟用您的擴充套件。當您的擴充套件宣告檢視貢獻時,VS Code 會自動為您完成此操作。當用戶開啟檢視時,VS Code 會發出一個 onView:${viewId} 啟用事件(對於上面的示例,是 onView:nodeDependencies)。
注意:對於 1.74.0 之前的 VS Code 版本,您必須在
package.json中顯式註冊此啟用事件,以便 VS Code 在此檢視上啟用您的擴充套件。"activationEvents": [ "onView:nodeDependencies", ],
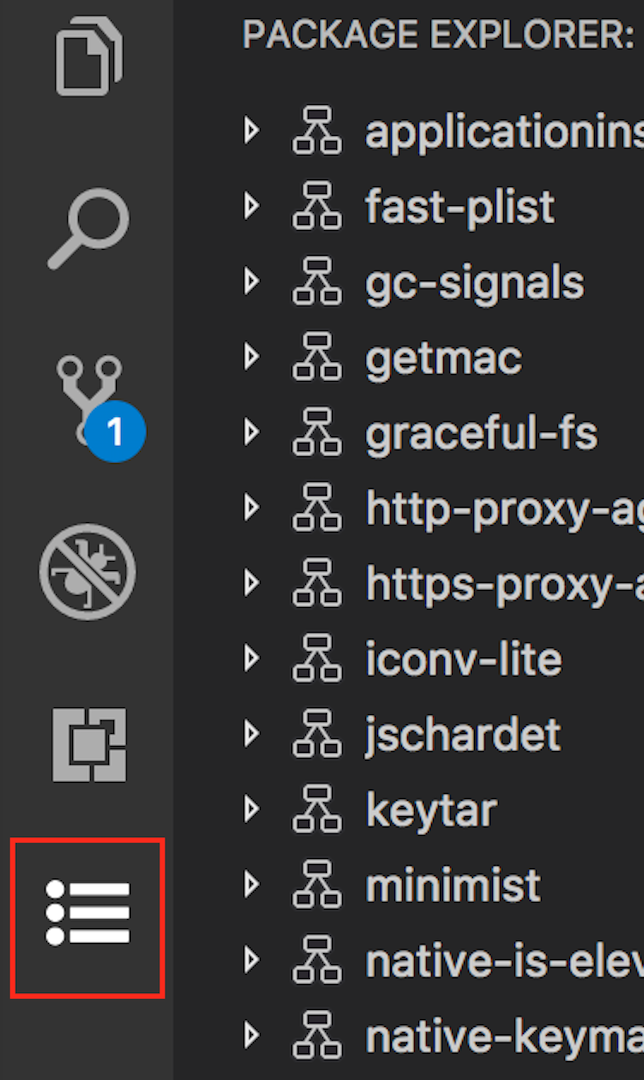
檢視容器
檢視容器包含一組顯示在活動欄或面板中的檢視,以及內建的檢視容器。內建檢視容器的示例包括原始碼管理和資源管理器。
要貢獻檢視容器,您應該首先使用 package.json 中的 contributes.viewsContainers 貢獻點註冊它。
您必須指定以下必需欄位:
id- 您正在建立的新檢視容器的 ID。title- 將顯示在檢視容器頂部的名稱。icon- 在活動欄中顯示檢視容器的影像。
"contributes": {
  "viewsContainers": {
    "activitybar": [
      {
        "id": "package-explorer",
        "title": "Package Explorer",
        "icon": "media/dep.svg"
      }
    ]
  }
}
或者,您可以透過將其放置在 panel 節點下,將此檢視貢獻給面板。
"contributes": {
  "viewsContainers": {
    "panel": [
      {
        "id": "package-explorer",
        "title": "Package Explorer",
        "icon": "media/dep.svg"
      }
    ]
  }
}
向檢視容器貢獻檢視
建立檢視容器後,您可以使用 package.json 中的 contributes.views 貢獻點。
"contributes": {
  "views": {
    "package-explorer": [
      {
        "id": "nodeDependencies",
        "name": "Node Dependencies",
        "icon": "media/dep.svg",
        "contextualTitle": "Package Explorer"
      }
    ]
  }
}
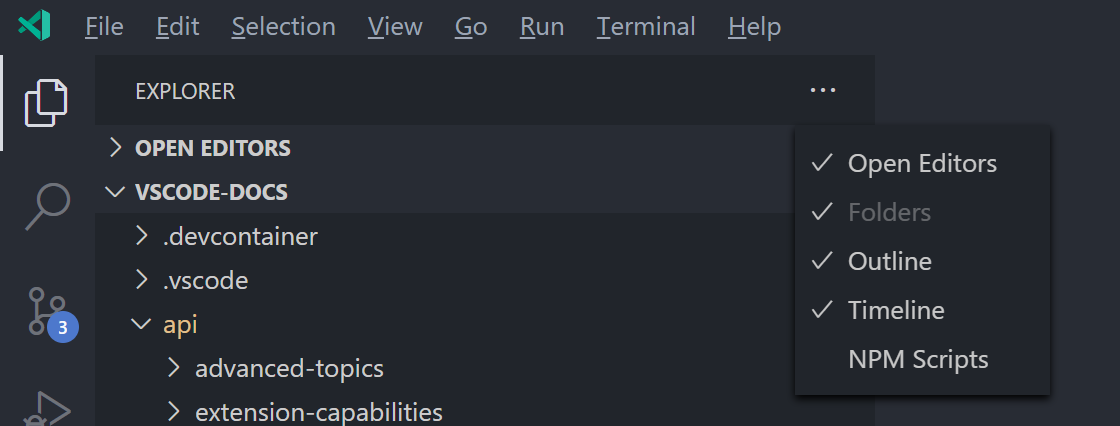
檢視還可以有一個可選的 visibility 屬性,可以設定為 visible、collapsed 或 hidden。此屬性僅在工作區首次開啟具有此檢視時被 VS Code 尊重。之後,可見性將設定為使用者所選的任何內容。如果您有一個包含許多檢視的檢視容器,或者您的檢視對擴充套件的每個使用者都可能不那麼有用,請考慮將檢視設定為 collapsed 或 hidden。hidden 檢視將出現在檢視容器的“檢視”選單中。
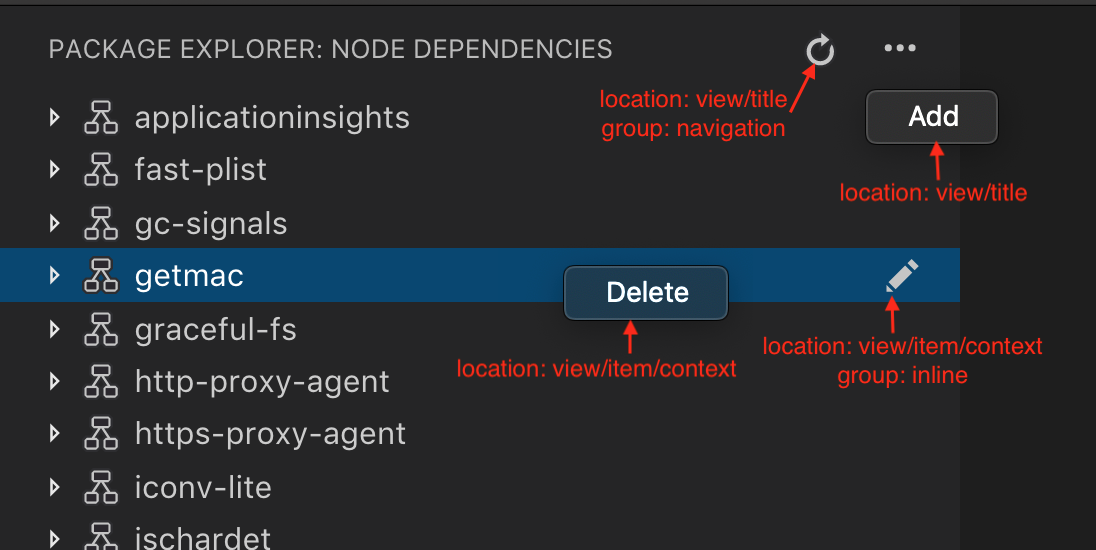
檢視操作
操作可以作為單個樹專案的內聯圖示、樹專案上下文選單以及檢視頂部的檢視標題顯示。操作是透過在 package.json 中新增貢獻來設定的命令,這些命令會顯示在這些位置。
要貢獻到這三個位置,您可以在 package.json 中使用以下選單貢獻點:
view/title- 在檢視標題中顯示操作的位置。主操作或內聯操作使用"group": "navigation",其餘為次要操作,位於...選單中。view/item/context- 在樹專案處顯示操作的位置。內聯操作使用"group": "inline",其餘為次要操作,位於...選單中。
您可以使用 when 子句控制這些操作的可見性。
示例
"contributes": {
  "commands": [
    {
      "command": "nodeDependencies.refreshEntry",
      "title": "Refresh",
      "icon": {
        "light": "resources/light/refresh.svg",
        "dark": "resources/dark/refresh.svg"
      }
    },
    {
      "command": "nodeDependencies.addEntry",
      "title": "Add"
    },
    {
      "command": "nodeDependencies.editEntry",
      "title": "Edit",
      "icon": {
        "light": "resources/light/edit.svg",
        "dark": "resources/dark/edit.svg"
      }
    },
    {
      "command": "nodeDependencies.deleteEntry",
      "title": "Delete"
    }
  ],
  "menus": {
    "view/title": [
      {
        "command": "nodeDependencies.refreshEntry",
        "when": "view == nodeDependencies",
        "group": "navigation"
      },
      {
        "command": "nodeDependencies.addEntry",
        "when": "view == nodeDependencies"
      }
    ],
    "view/item/context": [
      {
        "command": "nodeDependencies.editEntry",
        "when": "view == nodeDependencies && viewItem == dependency",
        "group": "inline"
      },
      {
        "command": "nodeDependencies.deleteEntry",
        "when": "view == nodeDependencies && viewItem == dependency"
      }
    ]
  }
}
預設情況下,操作按字母順序排序。要指定不同的排序,請在組名後新增 @ 和您想要的順序。例如,navigation@3 將使操作顯示在 navigation 組中的第三位。
您可以透過建立不同的組來進一步分隔 ... 選單中的專案。這些組名是任意的,並按組名按字母順序排序。
注意:如果您想為特定的樹專案顯示操作,可以透過定義樹專案的 TreeItem.contextValue 來實現,並在 when 表示式中為 viewItem 鍵指定上下文值。
示例
"contributes": {
  "menus": {
    "view/item/context": [
      {
        "command": "nodeDependencies.deleteEntry",
        "when": "view == nodeDependencies && viewItem == dependency"
      }
    ]
  }
}
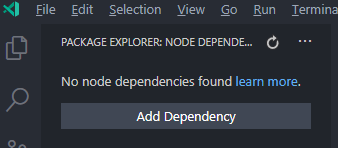
歡迎內容
如果您的檢視可能為空,或者您想向其他擴充套件的空檢視新增歡迎內容,您可以貢獻 viewsWelcome 內容。空檢視是沒有 TreeView.message 且樹為空的檢視。
"contributes": {
  "viewsWelcome": [
    {
      "view": "nodeDependencies",
      "contents": "No node dependencies found [learn more](https://www.npmjs.com/).\n[Add Dependency](command:nodeDependencies.addEntry)"
    }
  ]
}
歡迎內容支援連結。按約定,單獨一行的連結是按鈕。每個歡迎內容也可以包含一個 when 子句。有關更多示例,請參閱 內建 Git 擴充套件。
TreeDataProvider
擴充套件編寫者應透過程式設計方式註冊 TreeDataProvider 來填充檢視中的資料。
vscode.window.registerTreeDataProvider('nodeDependencies', new DepNodeProvider());
請參閱 tree-view-sample 中的 nodeDependencies.ts 以獲取實現。
TreeView
如果您想透過程式設計方式在檢視上執行一些 UI 操作,可以使用 window.createTreeView 而不是 window.registerTreeDataProvider。這將提供對檢視的訪問,您可以使用它來執行檢視操作。
vscode.window.createTreeView('ftpExplorer', {
  treeDataProvider: new FtpTreeDataProvider()
});
請參閱 tree-view-sample 中的 ftpExplorer.ts 以獲取實現。