使用 WebAssembly 進行擴充套件開發
2024 年 5 月 8 日,作者:Dirk Bäumer
Visual Studio Code 透過 WebAssembly Execution Engine 擴充套件支援 WASM 二進位制檔案的執行。主要用例是將用 C/C++ 或 Rust 編寫的程式編譯成 WebAssembly,然後在 VS Code 中直接執行這些程式。一個值得注意的例子是 Visual Studio Code for Education,它利用此支援在 VS Code for the Web 中執行 Python 直譯器。這篇 部落格文章 詳細介紹了其實現方式。
2024 年 1 月,Bytecode Alliance 推出了 WASI 0.2 預覽版。WASI 0.2 預覽版中的一項關鍵技術是 元件模型。WebAssembly 元件模型透過標準化介面、資料型別和模組組合,簡化了 WebAssembly 元件與其宿主環境之間的互動。這種標準化是透過使用 WIT(WASM 介面型別)檔案來實現的。WIT 檔案有助於描述 JavaScript/TypeScript 擴充套件(宿主)與執行其他語言(如 Rust 或 C/C++)程式碼計算的 WebAssembly 元件之間的互動。
這篇部落格文章概述了開發人員如何利用元件模型將 WebAssembly 庫整合到他們的擴充套件中。我們關注三個用例:(a)使用 WebAssembly 實現一個庫,並從 JavaScript/TypeScript 的擴充套件程式碼中呼叫它;(b)從 WebAssembly 程式碼呼叫 VS Code API;(c)演示如何使用資源來封裝和管理 WebAssembly 或 TypeScript 程式碼中的有狀態物件。
這些示例要求您已安裝最新版本的以下工具,以及 VS Code 和 NodeJS:Rust 編譯器工具鏈、wasm-tools 和 wit-bindgen。
在此,我還想感謝 Fastly 的 L. Pereira 和 Luke Wagner 對本文提出的寶貴意見。
Rust 中的計算器
在第一個示例中,我們演示了開發人員如何將用 Rust 編寫的庫整合到 VS Code 擴充套件中。如前所述,元件使用 WIT 檔案進行描述。在我們的示例中,該庫執行簡單的運算,如加法、減法、乘法和除法。對應的 WIT 檔案如下所示:
package vscode:example;

interface types {
	record operands {
		left: u32,
		right: u32
	}

	variant operation {
		add(operands),
		sub(operands),
		mul(operands),
		div(operands)
	}
}
world calculator {
	use types.{ operation };

	export calc: func(o: operation) -> u32;
}
Rust 工具 wit-bindgen 用於為計算器生成 Rust 繫結。有兩種方法可以使用此工具:
-
作為過程宏,直接在實現檔案中生成繫結。此方法是標準方法,但缺點是無法檢查生成的繫結程式碼。
-
作為 命令列工具,在磁碟上建立一個繫結檔案。下面的資源示例中的程式碼 VS Code 擴充套件示例儲存庫 中舉例說明了這種方法。
相應的 Rust 檔案使用 wit-bindgen 工具作為過程宏,如下所示:
// Use a procedural macro to generate bindings for the world we specified in
// `calculator.wit`
wit_bindgen::generate!({
	// the name of the world in the `*.wit` input file
	world: "calculator",
});
然而,使用命令 cargo build --target wasm32-unknown-unknown 將 Rust 檔案編譯到 WebAssembly 會因為缺少匯出的 calc 函式的實現而導致編譯錯誤。下面是 calc 函式的一個簡單實現:
// Use a procedural macro to generate bindings for the world we specified in
// `calculator.wit`
wit_bindgen::generate!({
	// the name of the world in the `*.wit` input file
	world: "calculator",
});

struct Calculator;

impl Guest for Calculator {

    fn calc(op: Operation) -> u32 {
		match op {
			Operation::Add(operands) => operands.left + operands.right,
			Operation::Sub(operands) => operands.left - operands.right,
			Operation::Mul(operands) => operands.left * operands.right,
			Operation::Div(operands) => operands.left / operands.right,
		}
	}
}

// Export the Calculator to the extension code.
export!(Calculator);
檔案末尾的 export!(Calculator); 語句會將 Calculator 從 WebAssembly 程式碼匯出,以便擴充套件能夠呼叫該 API。
wit2ts 工具用於生成在 VS Code 擴充套件中與 WebAssembly 程式碼互動所需的 TypeScript 繫結。此工具由 VS Code 團隊開發,以滿足 VS Code 擴充套件架構的特定要求,主要是因為:
- VS Code API 僅在擴充套件宿主工作器中可用。從擴充套件宿主工作器生成的任何其他工作器都無法訪問 VS Code API,這與 NodeJS 或瀏覽器等環境形成對比,在這些環境中,每個工作器通常都可以訪問幾乎所有執行時 API。
- 多個擴充套件共享同一個擴充套件宿主工作器。擴充套件應避免在該工作器上執行任何長時間執行的同步計算。
當我們實現 VS Code 的 WASI 預覽版 1 時,這些架構要求已經存在。但是,我們最初的實現是手動編寫的。為了預期元件模型的更廣泛採用,我們開發了一個工具來促進元件與 VS Code 特定的宿主實現的整合。
命令 wit2ts --outDir ./src ./wit 會在 src 資料夾中生成一個 calculator.ts 檔案,其中包含 WebAssembly 程式碼的 TypeScript 繫結。一個利用這些繫結的簡單擴充套件將如下所示:
import * as vscode from 'vscode';
import { WasmContext, Memory } from '@vscode/wasm-component-model';

// Import the code generated by wit2ts
import { calculator, Types } from './calculator';

export async function activate(context: vscode.ExtensionContext): Promise<void> {
  // The channel for printing the result.
  const channel = vscode.window.createOutputChannel('Calculator');
  context.subscriptions.push(channel);

  // Load the Wasm module
  const filename = vscode.Uri.joinPath(
    context.extensionUri,
    'target',
    'wasm32-unknown-unknown',
    'debug',
    'calculator.wasm'
  );
  const bits = await vscode.workspace.fs.readFile(filename);
  const module = await WebAssembly.compile(bits);

  // The context for the WASM module
  const wasmContext: WasmContext.Default = new WasmContext.Default();

  // Instantiate the module
  const instance = await WebAssembly.instantiate(module, {});
  // Bind the WASM memory to the context
  wasmContext.initialize(new Memory.Default(instance.exports));

  // Bind the TypeScript Api
  const api = calculator._.exports.bind(
    instance.exports as calculator._.Exports,
    wasmContext
  );

  context.subscriptions.push(
    vscode.commands.registerCommand('vscode-samples.wasm-component-model.run', () => {
      channel.show();
      channel.appendLine('Running calculator example');
      const add = Types.Operation.Add({ left: 1, right: 2 });
      channel.appendLine(`Add ${api.calc(add)}`);
      const sub = Types.Operation.Sub({ left: 10, right: 8 });
      channel.appendLine(`Sub ${api.calc(sub)}`);
      const mul = Types.Operation.Mul({ left: 3, right: 7 });
      channel.appendLine(`Mul ${api.calc(mul)}`);
      const div = Types.Operation.Div({ left: 10, right: 2 });
      channel.appendLine(`Div ${api.calc(div)}`);
    })
  );
}
當您在 VS Code for the Web 中編譯並執行上述程式碼時,它會在 Calculator 通道中產生以下輸出:
您可以在 VS Code 擴充套件示例儲存庫 中找到此示例的完整原始碼。
在 @vscode/wasm-component-model 中
檢查 wit2ts 工具生成的原始碼會發現它依賴於 @vscode/wasm-component-model npm 模組。該模組是 VS Code 對 元件模型的規範 ABI 的實現,並借鑑了相應的 Python 程式碼。雖然理解此部落格文章不必理解元件模型的內部工作原理,但我們將對其工作原理進行一些闡述,特別是關於資料如何在 JavaScript/TypeScript 和 WebAssembly 程式碼之間傳遞。
與生成 WIT 檔案繫結的其他工具(如 wit-bindgen 或 jco)不同,wit2ts 建立一個元模型,然後可以在執行時使用該元模型為各種用例生成繫結。這種靈活性使我們能夠滿足 VS Code 中擴充套件開發所需的架構要求。透過使用這種方法,我們可以“promisify”繫結並實現在工作器中執行 WebAssembly 程式碼。我們採用這種機制來實現 VS Code 的 WASI 0.2 預覽版。
您可能已經注意到,在生成繫結時,函式是透過名稱引用的,例如 calculator._.imports.create(注意下劃線)。為了避免與 WIT 檔案中的符號發生名稱衝突(例如,可能有一個名為 imports 的型別定義),API 函式被放置在 _ 名稱空間中。元模型本身位於 $ 名稱空間中。因此,calculator.$.exports.calc 代表了匯出的 calc 函式的元資料。
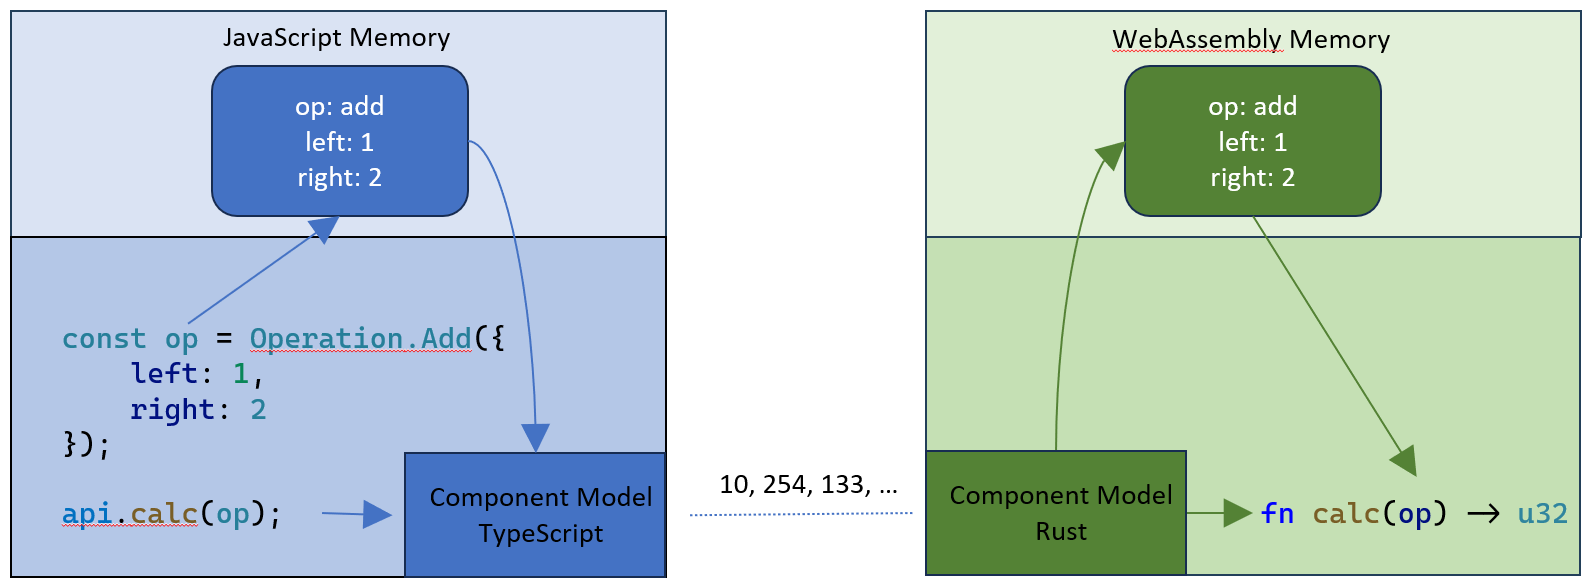
在上面的示例中,傳遞給 calc 函式的 add 操作引數包含三個欄位:操作碼、左值和右值。根據元件模型的規範 ABI,引數按值傳遞。它還概述了資料是如何序列化、傳遞給 WebAssembly 函式以及在另一端反序列化的。此過程會產生兩個操作物件:一個在 JavaScript 堆上,另一個在 WebAssembly 的線性記憶體中。下圖說明了這一點:
下表列出了可用的 WIT 型別、它們在 VS Code 元件模型實現中的 JavaScript 物件對映以及相應的 TypeScript 型別:
| WIT | JavaScript | TypeScript |
|---|---|---|
| u8 | number | type u8 = number; |
| u16 | number | type u16 = number; |
| u32 | number | type u32 = number; |
| u64 | bigint | type u64 = bigint; |
| s8 | number | type s8 = number; |
| s16 | number | type s16 = number; |
| s32 | number | type s32 = number; |
| s64 | bigint | type s64 = bigint; |
| float32 | number | type float32 = number; |
| float64 | number | type float64 = number; |
| bool | 布林值 | 布林值 |
| 字串 | 字串 | 字串 |
| char | string[0] | 字串 |
| record | object literal | type declaration |
| list<T> | [] | Array<T> |
| tuple<T1, T2> | [] | [T1, T2] |
| enum | string values | string enum |
| flags | number | bigint |
| variant | object literal | discriminated union |
| option<T> | variable | ? and (T | undefined) |
| result<ok, err> | Exception or object literal | Exception or result type |
需要注意的是,元件模型不支援低階(C 風格)指標。因此,您無法傳遞物件圖或遞迴資料結構。在這方面,它與 JSON 具有相同的限制。為了最大限度地減少資料複製,元件模型引入了資源的概念,我們將在部落格文章的後續部分更詳細地探討這一點。
jco 專案 也支援使用 type 命令為 WebAssembly 元件生成 JavaScript/TypeScript 繫結。如前所述,我們開發了自己的工具來滿足 VS Code 的特定需求。但是,我們與 jco 團隊進行雙週會議,以確保工具之間的相容性。一項基本要求是,這兩個工具都應使用相同的 JavaScript 和 TypeScript 表示形式來表示 WIT 資料型別。我們還在探索在兩個工具之間共享程式碼的可能性。
從 WebAssembly 程式碼呼叫 TypeScript
WIT 檔案描述了宿主(VS Code 擴充套件)與 WebAssembly 程式碼之間的互動,促進了雙向通訊。在我們的示例中,此功能允許 WebAssembly 程式碼記錄其活動的跟蹤。為了實現這一點,我們修改了 WIT 檔案如下:
world calculator {

	/// ....

	/// A log function implemented on the host side.
	import log: func(msg: string);

	/// ...
}
在 Rust 端,我們現在可以呼叫 log 函式:
fn calc(op: Operation) -> u32 {
	log(&format!("Starting calculation: {:?}", op));
	let result = match op {
		// ...
	};
	log(&format!("Finished calculation: {:?}", op));
	result
}
在 TypeScript 端,擴充套件開發人員需要做的唯一操作就是提供 log 函式的實現。VS Code 元件模型然後會促進生成必要的繫結,這些繫結將作為匯入傳遞給 WebAssembly 例項。
export async function activate(context: vscode.ExtensionContext): Promise<void> {
  // ...

  // The channel for printing the log.
  const log = vscode.window.createOutputChannel('Calculator - Log', { log: true });
  context.subscriptions.push(log);

  // The implementation of the log function that is called from WASM
  const service: calculator.Imports = {
    log: (msg: string) => {
      log.info(msg);
    }
  };

  // Create the bindings to import the log function into the WASM module
  const imports = calculator._.imports.create(service, wasmContext);
  // Instantiate the module
  const instance = await WebAssembly.instantiate(module, imports);

  // ...
}
與第一個示例相比,WebAssembly.instantiate 呼叫現在包含 calculator._.imports.create(service, wasmContext) 的結果作為第二個引數。此 imports.create 呼叫從服務實現生成低階 WASM 繫結。在第一個示例中,我們傳遞了一個空物件字面量,因為不需要匯入。這次,我們在 VS Code 桌面環境中透過偵錯程式執行該擴充套件。得益於 Connor Peet 的出色工作,現在可以在 Rust 程式碼中設定斷點並透過 VS Code 偵錯程式進行除錯。
使用元件模型資源
WebAssembly 元件模型引入了資源的概念,它提供了一種封裝和管理狀態的標準化機制。這種狀態在一個呼叫邊界的一側(例如,在 TypeScript 程式碼中)進行管理,並在另一側(例如,在 WebAssembly 程式碼中)進行訪問和操作。資源在 WASI 預覽版 0.2 API 中被廣泛使用,檔案描述符是一個典型的例子。在此設定中,狀態由擴充套件宿主管理,並由 WebAssembly 程式碼訪問和操作。
資源也可以反向工作,其狀態由 WebAssembly 程式碼管理,並由擴充套件程式碼訪問和操作。這種方法特別有利於 VS Code 實現 WebAssembly 中的有狀態服務,然後從 TypeScript 端進行訪問。在下面的示例中,我們定義了一個實現支援 逆波蘭表示法 的計算器的資源,類似於 Hewlett-Packard 手持計算器中使用的。
// wit/calculator.wit
package vscode:example;

interface types {

	enum operation {
		add,
		sub,
		mul,
		div
	}

	resource engine {
		constructor();
		push-operand: func(operand: u32);
		push-operation: func(operation: operation);
		execute: func() -> u32;
	}
}
world calculator {
	export types;
}
下面是 Rust 中計算器資源的簡單實現:
impl EngineImpl {
	fn new() -> Self {
		EngineImpl {
			left: None,
			right: None,
		}
	}

	fn push_operand(&mut self, operand: u32) {
		if self.left == None {
			self.left = Some(operand);
		} else {
			self.right = Some(operand);
		}
	}

	fn push_operation(&mut self, operation: Operation) {
        let left = self.left.unwrap();
        let right = self.right.unwrap();
        self.left = Some(match operation {
			Operation::Add => left + right,
			Operation::Sub => left - right,
			Operation::Mul => left * right,
			Operation::Div => left / right,
		});
	}

	fn execute(&mut self) -> u32 {
		self.left.unwrap()
	}
}
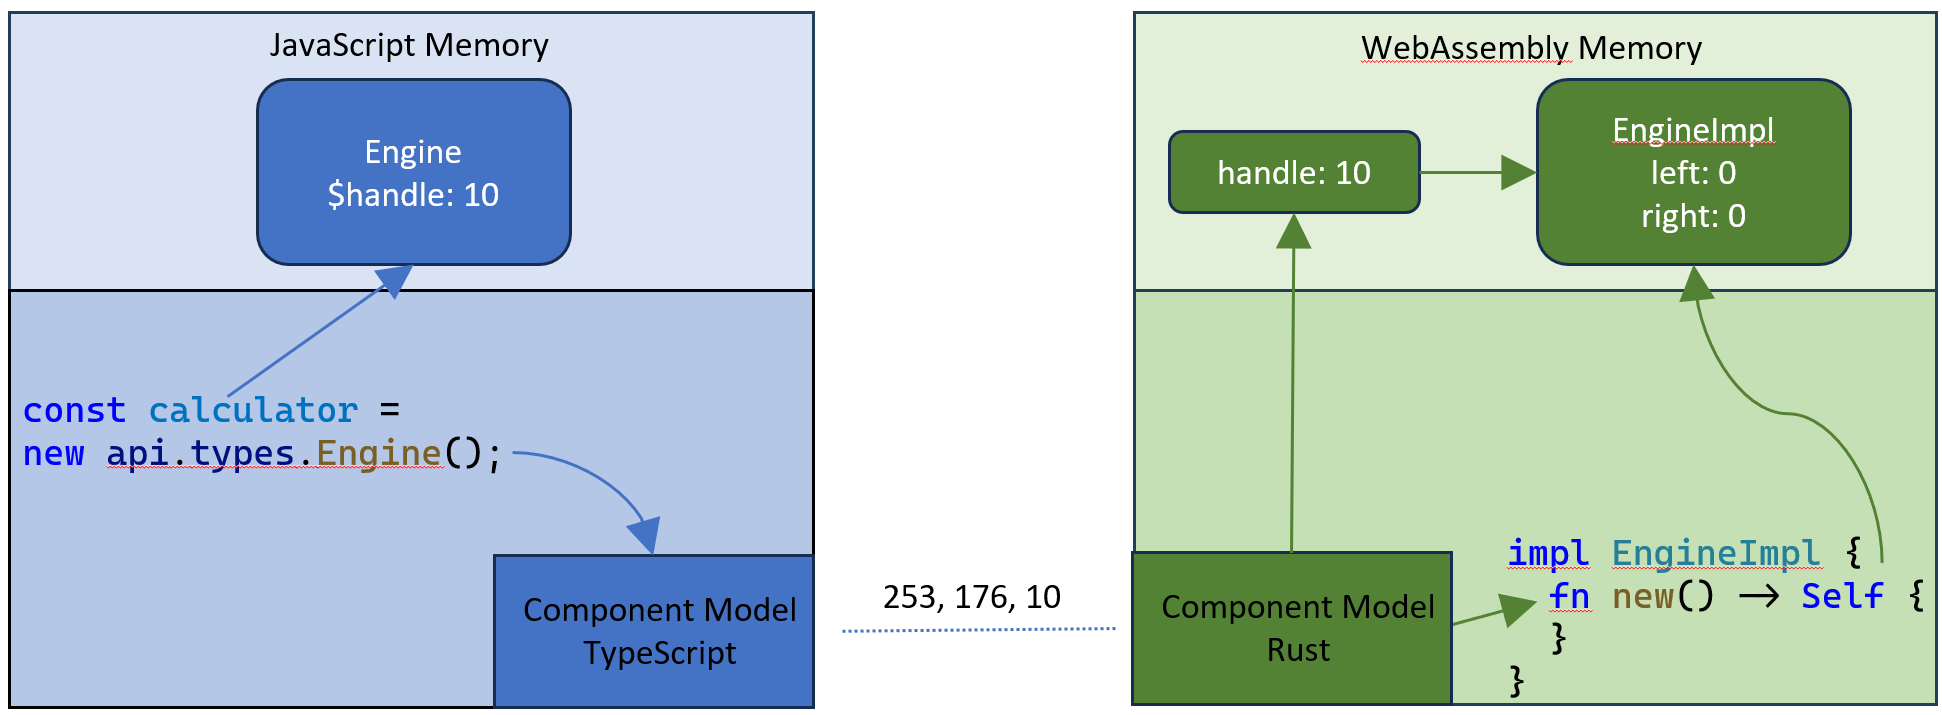
在 TypeScript 程式碼中,我們以與之前相同的方式繫結匯出。唯一的區別是,繫結過程現在為我們提供了一個代理類,用於在 WebAssembly 程式碼中例項化和管理 calculator 資源。
// Bind the JavaScript Api
const api = calculator._.exports.bind(
  instance.exports as calculator._.Exports,
  wasmContext
);

context.subscriptions.push(
  vscode.commands.registerCommand('vscode-samples.wasm-component-model.run', () => {
    channel.show();
    channel.appendLine('Running calculator example');

    // Create a new calculator engine
    const calculator = new api.types.Engine();

    // Push some operands and operations
    calculator.pushOperand(10);
    calculator.pushOperand(20);
    calculator.pushOperation(Types.Operation.add);
    calculator.pushOperand(2);
    calculator.pushOperation(Types.Operation.mul);

    // Calculate the result
    const result = calculator.execute();
    channel.appendLine(`Result: ${result}`);
  })
);
當您執行相應的命令時,它會在輸出通道中列印 Result: 60。如前所述,資源的狀態位於呼叫邊界的一側,並使用控制代碼從另一側訪問。除了傳遞給與資源互動的方法的引數外,不會發生資料複製。
此示例的完整原始碼可在 VS Code 擴充套件示例儲存庫 中找到。
直接從 Rust 呼叫 VS Code API
元件模型資源可用於封裝和管理 WebAssembly 元件和宿主之間的狀態。此功能使我們能夠利用資源將 VS Code API 以規範化的方式公開到 WebAssembly 程式碼中。此方法的優點在於,整個擴充套件都可以用編譯為 WebAssembly 的語言編寫。我們已經開始探索這種方法,下面是一個用 Rust 編寫的擴充套件的原始碼:
use std::rc::Rc;

#[export_name = "activate"]
pub fn activate() -> vscode::Disposables {
	let mut disposables: vscode::Disposables = vscode::Disposables::new();

	// Create an output channel.
	let channel: Rc<vscode::OutputChannel> = Rc::new(vscode::window::create_output_channel("Rust Extension", Some("plaintext")));

	// Register a command handler
	let channel_clone = channel.clone();
	disposables.push(vscode::commands::register_command("testbed-component-model-vscode.run", move || {
		channel_clone.append_line("Open documents");

		// Print the URI of all open documents
		for document in vscode::workspace::text_documents() {
			channel.append_line(&format!("Document: {}", document.uri()));
		}
	}));
	return disposables;
}

#[export_name = "deactivate"]
pub fn deactivate() {
}
請注意,此程式碼類似於用 TypeScript 編寫的擴充套件。
儘管這項探索看起來很有希望,但我們目前決定不繼續進行。主要原因是 WASM 缺乏非同步支援。許多 VS Code API 是非同步的,這使得它們很難直接代理到 WebAssembly 程式碼中。我們可以將 WebAssembly 程式碼執行在一個單獨的工作器中,並使用在 WASI 預覽版 1 支援 中用於 WebAssembly 工作器和擴充套件宿主工作器之間的相同同步機制。然而,這種方法可能會在同步 API 呼叫期間導致意外行為,因為這些呼叫實際上將非同步執行。結果是,在兩次同步呼叫之間,可觀察到的狀態可能會發生變化(例如,setX(5); getX(); 可能不會返回 5)。
此外,目前正在努力在 0.3 預覽版中為 WASI 引入完整的非同步支援。Luke Wagner 在 WASM I/O 2024 上提供了關於非同步支援當前狀態的更新。我們已決定等待此支援,因為它將實現更完整、更清晰的實現。
如果您對相應的 WIT 檔案、Rust 程式碼和 TypeScript 程式碼感興趣,可以在 vscode-wasm 儲存庫的 rust-api 資料夾中找到它們:rust-api。
下一步
我們目前正在準備一篇後續部落格文章,其中將涵蓋 WebAssembly 程式碼可用於擴充套件開發的更多領域。主要主題將包括:
- 用 WebAssembly 編寫 語言伺服器。
- 使用生成的元模型將長時間執行的 WebAssembly 程式碼透明地解除安裝到單獨的工作器。
隨著 VS Code 對元件模型的符合 VS Code 慣用法實現的到位,我們將繼續努力為 VS Code 實現 WASI 0.2 預覽版。
謝謝,
Dirk 和 VS Code 團隊
編碼愉快!